One of my favourite lenses for macro food photography is the Nikkor 105mm macro. I remember back when I first started in food photography. I was looking to take my work to the next level and discovered that a lot of the shots I wanted to take required this type of narrow macro.
From the get-go, I loved working with this lens. But sadly, I hear from so many other photographers that they don’t share my love for this lens.
The most common thing I hear is that they aren’t able to get in focus shots. After talking to many other photographers about their focus issues with macros, it became clear there was a lack of understanding about the plane of focus.
Many aren’t aware of what it is and how it affects macro photography. So I’d love to change that with this post.
Let’s chat plane of focus for macro food photography. Read on friends!

What is The Plane of Focus
Simply put:
The plane of focus is a two-dimensional ‘plane’ in front of the camera at the point of focus. This plane will give you the sharpest focus at a particular depth of field.
Just re-read that for a sec. Let it sink in.
This is an imaginary plane and lies parallel to the camera sensor, (unless using a something like a tilt-shift lens. It doesn’t follow these rules). When you change the position or angle of your camera, the plane of focus remains relative to the sensor.
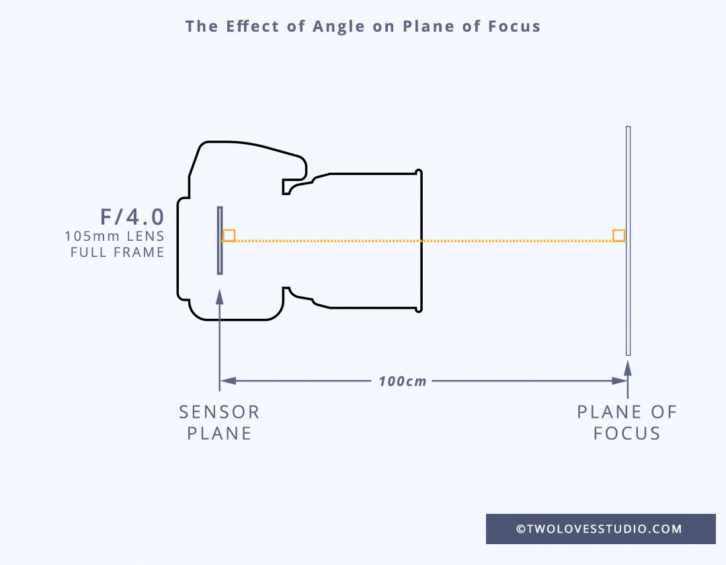
That means the plane of focus changes as the angle changes, (but it always remains parallel to the sensor).
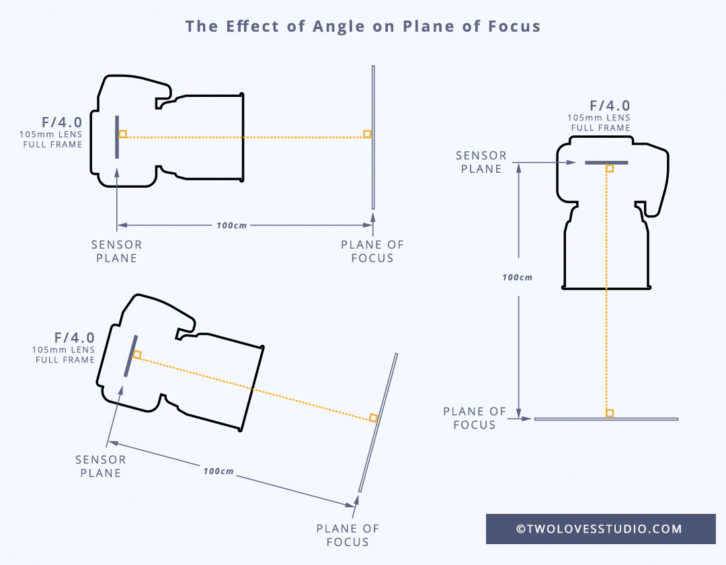
The plane of focus is relevant for not just a macro lens, but photography in general. So whether you are using a macro lens or not, for tack sharp focus, the plane of focus is something you want to familiarise yourself with.
Here it is visually. At the point in which you focus on, that is where the plane of focus will be.
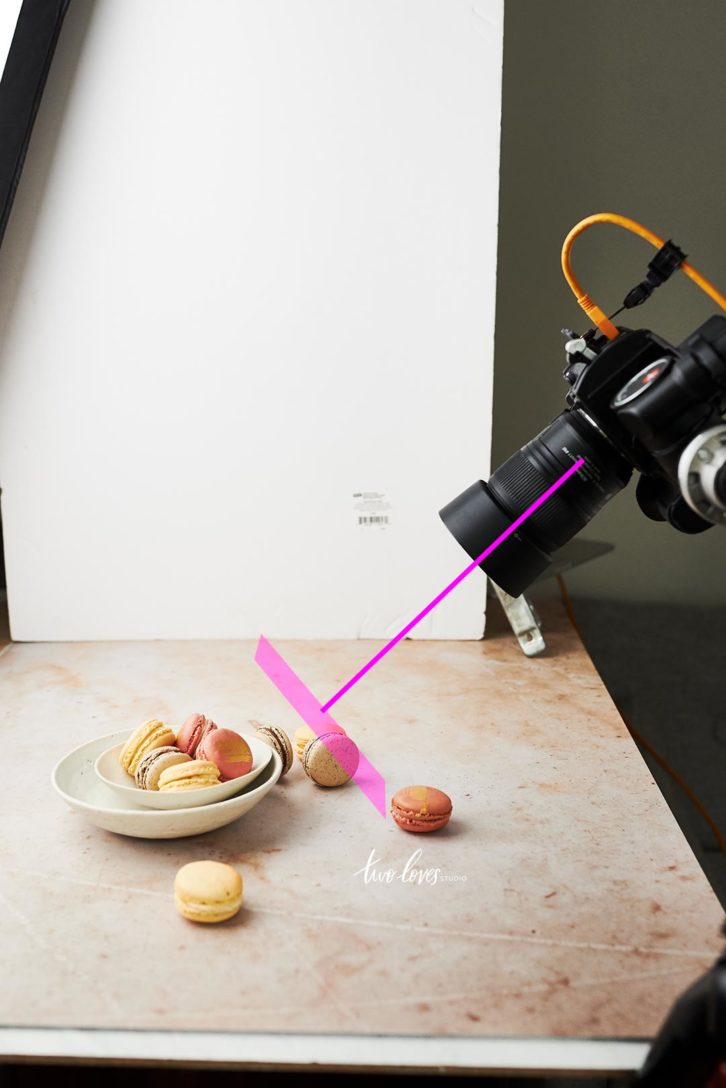
Now the Depth of Field, will be around the plane of focus as you can see above.
If you missed Lauren Caris’s post on everything you need to know about macros, click to get savvy then read on!
Related: Want to read more on what Macro Photography is? Check out this post for 12 Tips for Macro Photographers.
Do You Really Know Depth of Field?
It’s reasonable to assume that you know what depth of field is if you’re reading this post. But there are two points I want to make that even I didn’t fully understand until a few years into my journey.
Firstly, let’s recap depth of field.
Depth of field is the distance between the nearest and further objects that are in acceptably sharp focus.
Wiki
The depth of field is determined by the focal length of your lens, the distance to your subject and your aperture.
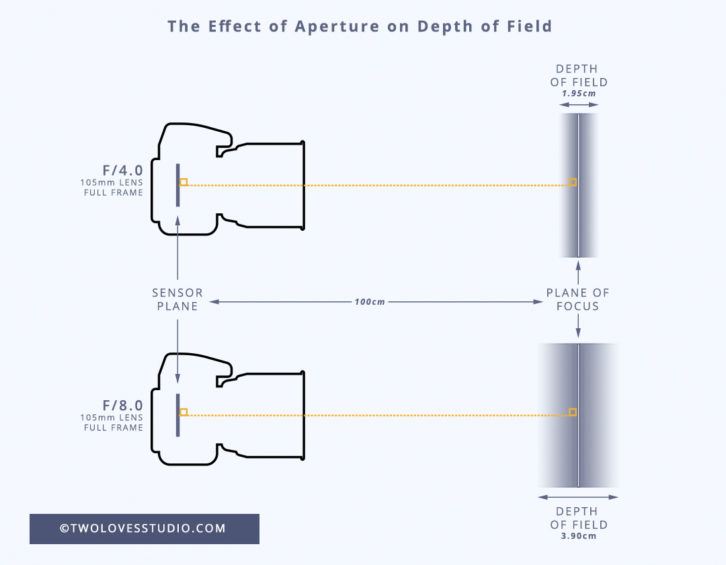


Here we have the same image, at the same distance, but just different apertures. One large (small number f/3.5) and one small (large number f/8). You can see that we have different depth of field (DoF) as we have different amounts of focus in both images.
But what you may not have known about with depth of field is that the smaller the distance from your subject, the thinner the depth of field. I won’t get into the ‘why’ behind this, but let’s just say it’s physics.
To recap this point as it’s important:
The smaller the distance to your subject, the thinner your DoF is at any given aperture.
Matt Korinek
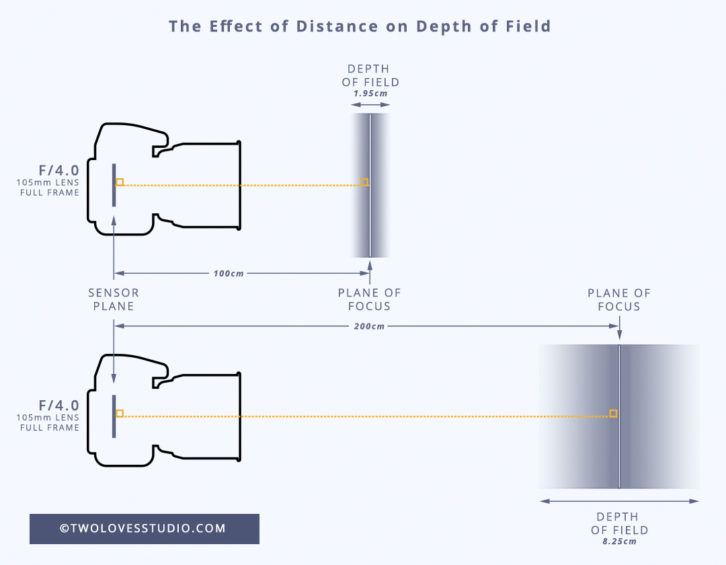
If you’re 2m (6ft) away from your subject shooting at f/4 the depth of field will be 8.25cm (3.2″) wide. But half that, to say 1m (3ft) away from your subject at f/4, your DoF is 1.95cm (0.76″).
That’s 4 times thinner at the closer distance.
So with a macro, f/8 will be super shallow if you are really close to your subject.
Which brings me to the next point.
We See Thinner DoF With Macro Lenses Due to Smaller Distances
Now that we know we can get closer to our subject, (which is only possible with a macro due to the minimum focusing distance of these lenses), we can understand why macro lenses feel shallower.
Using a DoF calculator, I’ve calculated the relative depth of field (how ‘thin’ or ‘thick’ DoF is) at:
- The minimum focusing distance of the Nikkor 105mm micro
- The distance I like to typically shoot with my Nikkor 105mm micro
- The minimum focusing distance of a non-macro at 100mm
Let’s look a this visually.
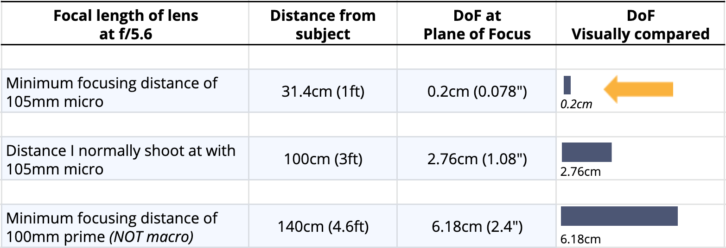
Even if you are finding it hard to understand this concept, just look at the bars above in ‘visually compared’. See how incredibly ‘thin’ the DoF is at minimum focus distance where the yellow arrow is pointing.
This is why so many photographers feel their macro lenses aren’t performing in terms of focus. Because they are shooting on the same apertures they would at larger distances.


In the little Mocha Cake on the right, even at f/8, look at how shallow or ‘thin’ this DoF is. Here I am at about minimum focus distance for this lens. So I have a thin amount of DoF here. Hence a smaller aperture (larger number like f/8).
So to offset this, when shooting with our macro lenses we need to change our aperture. For my macro lens, I typically start shooting at an aperture of f/5.6-f/8.
Again, this will depend on the distance, but for those close macro shots, I start here.
Now, you’re ready to dive into the plane of focus. Let’s go!
Related: Check out this post on what makes a macro lens different.
How The Plane of Focus Works
When we select a point to focus on in our frame, that becomes the plane in which we find things in focus. Now remember that this plane is parallel to the camera’s sensor. So as we change our camera’s angle, we change this plane.
Anything that is in front of this plane will be out of focus. Similarly, anything beyond this plane will also be out of focus.
(And here’s the cool thing, the degree to which it is out of focus depends on your aperture and relative distance).
Both of these shots are taken at a similar distance and with the same settings.


But in the image on the right, more of our subjects are in focus. (I purposefully shot at the largest aperture I could to get as much blur to visually see this working).
This is due to the plane of focus, and where I focused in the frame. Both times I focused on the pink macaron in the bowl.
The Plane of Focus With Visual Examples
Now that you’ve seen the results, let’s look at the plane of focus for each shot. (Remembering that our plane of focus is parallel to the camera’s sensor at the point of focus.)
The camera is at the same distance, with the same settings. Only the angle is changed, (and hence the plane of focus which is the pink line).

–

–
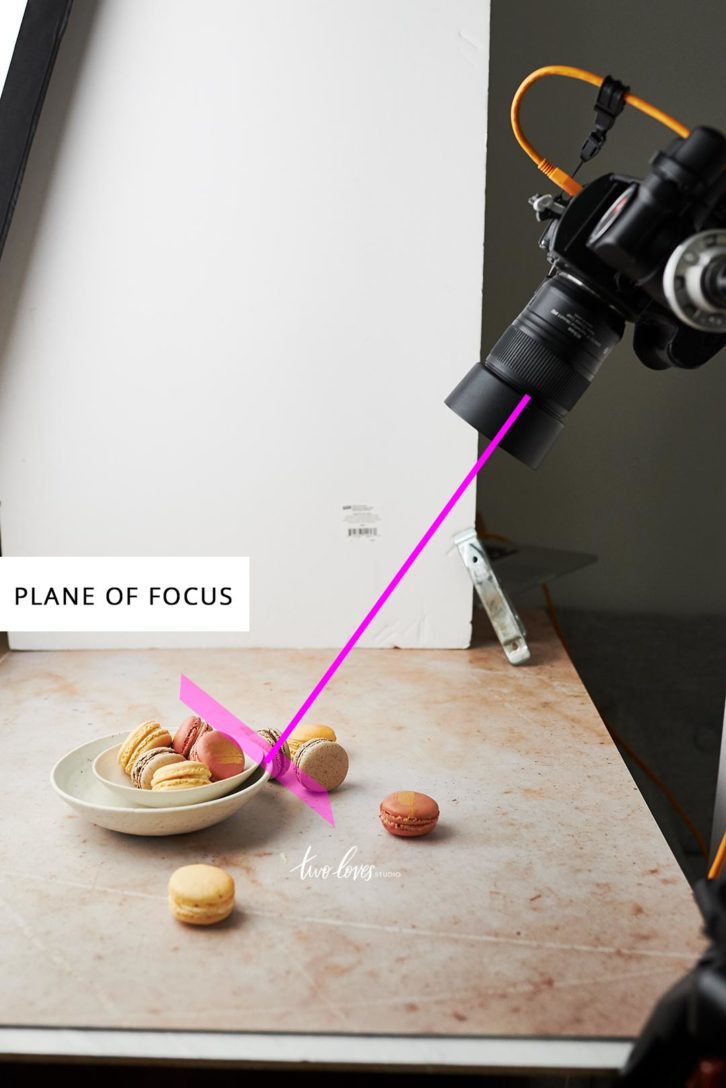
45-degree angle.
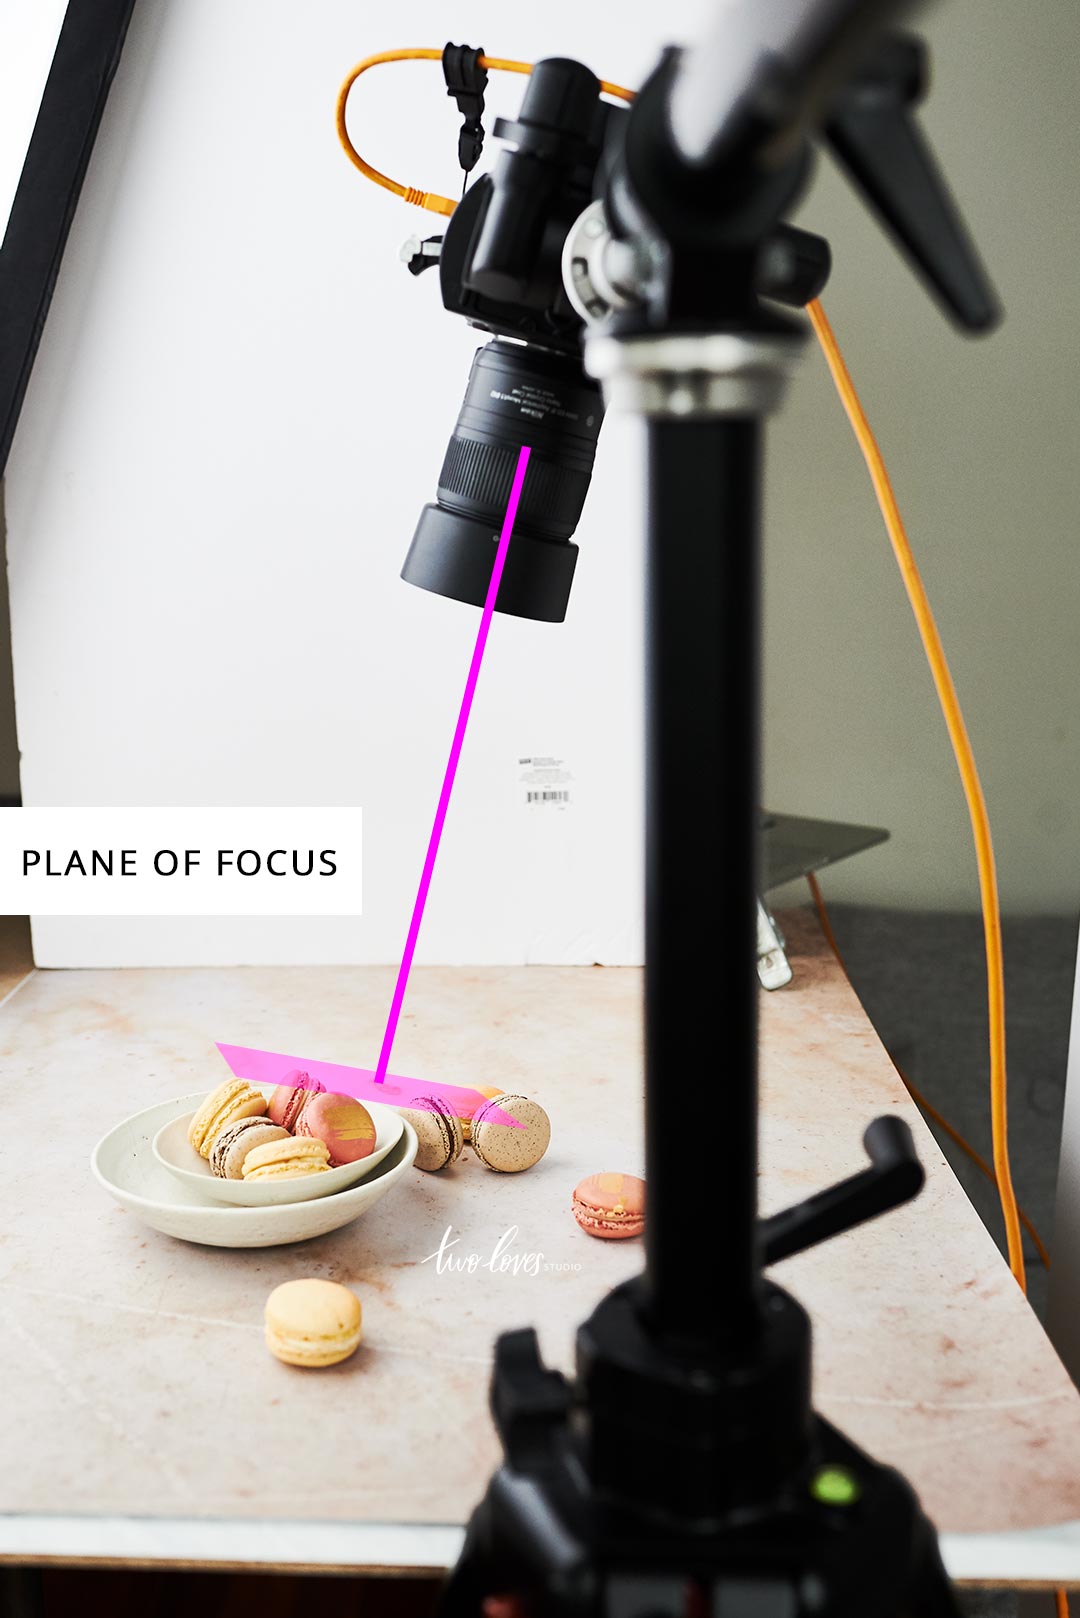
75-degree angle.
You can see from the behind the scenes shots that our plane of focus in this second shot, the 75-degree angle ‘touches’ the top of more subjects.
This is what allows this second angle to give more focus.
How To Get More of Your Frame in Focus.
Depending on your concept and subject, you may want more of the scene in focus. When using a macro lens, there are two things you need to consider.
They are:
- The aperture that you are shooting at and
- The plane of focus due to the angle/position of your camera/sensor
Sometimes just changing the aperture won’t be enough to bring what you want into focus as we’ve seen. (Because the DoF is thinner at smaller distances).
So you might need to change your angle in combination with your aperture.
As we are relatively closer to our subject with a macro lens, you can still achieve a shallow depth of field at smaller apertures.
The first thing you will want to do is increase the depth of field by shooting at a smaller aperture (larger number!). If that doesn’t give you the focus you want, then you will also want to change your angle for a different plane of focus.

Recipe by Tessa Huff ~ Icing On The Cake
Recap of Main Points
Now I know this can feel like a complex subject, so if you feel a little like ‘wha?’, here are the main takeaways.
- The plane of focus is a two-dimensional ‘plane’ in front of the camera at the point of focus.
- It’s parallel to the camera’s sensor and will give you the sharpest focus at a particular DoF.
- With our macro lens, we can get closer to our subjects so the effects of DoF give us shallower results at each relative aperture.
- The closer you are, (the less distance), the thinner DoF is. You’ll see the effects of focus/blur more.
- To get more in focus with your macro lens, change your aperture to smaller aperture (larger number) and/or –
- Change the angle and hence the plane of focus so it’s ‘touching’ more subjects at the same level that you want in focus.
Want to know a little bit more about what makes a macro lens different? Check out Lauren Caris’ post she did in collaboration with me.


Lauren
Such an informative post Rachel. I love how you laid how how the distance from the subject affects the DoF. Such an important part of food photography!
Rachel
Thanks for dropping by Lauren! Glad you enjoyed it. That’s how my hubby taught me, so I thought it would be a good visual way to present the differences.
Reethika
So informative. There’s so much science behind using Macro lenses. I did have to reread some parts to completely comprehend and there were times I was a bit lost. But I have a better understanding of what to do now and I will certainly keep these pointers in mind (might even have to refer back to this blog post) the next time I’m shooting with my 100mm macro. Thank you, Rachel.
Rachel
For sure Reethika! It’s not a simple concept, which is why this post is a little more advanced. Hopefully, the visuals of DoF with the bars help you understand. In a nutshell, all you need to know is that the closer we are to our subjects, DoF becomes thinner. So a lot of macro photography should have smaller apertures (larger numbers like f/8-f/22).
Barbara
Great post Rachel! Clearly written and easy to understand.
Rachel
SO glad to hear that Barbara! It can be a complex topic to understand. The bars for DoF are my favourite 🙂
eileen
Aha moment… the lightbulb went off! Thanks Rachel for explaining that. It now makes a lot more sense and hopefully my macro shots will look a little sharper. Thank you again!
Rachel
I hope so too Eileen! It’s such a needed technique for those sharp shots. Let me know how you go! 🙂
Darlene
Great post, Rachel! I’m a pet photographer tackling the world of food photography – and it is so very different and a whole new world! Looking forward to working more with my 100mm macro. Appreciate the tips!
Rachel
Thanks for stopping by Darlene! It sure is, and this will give you the focus you’re after. Food is so different to pets, but I am sure you have to be just as patient with pets as you do with food haha 🙂
Charul
Such a great post, Rachel. So much information and thank you for including the pictures, I am more of a practical learner and reading a lot of information gets overwhelming for me, at times. The pictures help immensely.
I always wondered why some macro shots are more crisp than others and now I know. I want to play more with it. I will keep this post bookmarked.
Rachel
Hey Charul, thanks for stopping by! Totally. It’s a difficult thing to understand without visuals. I am so glad they helped. Focus is such an in-depth topic, and so many things go into it. At least with this, you’ve got some actionable things to approach with now 🙂
Aysegul Sanford
I have been photographing with my 100 mm for over 5 years now and figured it out by trial and error. But the way you explained here made so much sense and helped me understand how it all works in the technical sense. Thanks for such a helpful and informative post Rachel.
Rachel
Totally! I was the same and it was only a few years ago when people started telling me that their macros weren’t working that I realised what the technical aspect was. And the biggest thing is that for focus, in general, this is a crucial concept. It’s just was more pronounced with macro lenses that we don’t even realise it! Thanks for stopping by my friend.
Cindy
Thanks Rachel. I read Lauren’s post yesterday and combined with reading yours today, I had a HUGE aha moment. I was always shooting at at very shallow DOF with my macro lens. I thought that was the right thing to do. Could not understand why I was not getting sharp images. I now understand that I need to adjust the DOF and play more with the angle to get the focus sharpness I desire.
You and Lauren are a pretty great team!
Rachel
So excited to hear that Cindy! I think we all start out doing this exact thing, which is why Lauren and I wanted to do this challenge. Super excited to see your pics for the #ShootMacro challenge. Thanks for stopping by.
Alexa
Thank you!!!! I have noticed lately that I have a terrible habit in general of shooting with my aperture wide open—but I’m often disappointed with my background being too blurry, my plane of focus being too thin. This helps A LOT.
Rachel
Hey Alexa! You nailed it! So excited that now you can fix this to get the shots you want. I think it’s something every photographer does when first doing macro photography. I know I certainly did. Physics is incredible, and sometimes hard to comprehend. Please keep me updated when you nail your focus.
Dyutima Jha
This is POW!
I recently shot at a restaurant where the space was tight but I also really wanted to use the 105mm.
I worked around the aperture a few times to get the desired focus but now I feel like I could’ve made some angle changes too.
So much information packed here. Love this post. Thanks for sharing.
Rachel
Ah, that’s awesome! It can be tough in tight spaces, but now you know for next time! Hope the job went well 🙂
Diana
This article was a real eye opener, which came in just time as i was about to ditch my Nikkor 60mm macro lens as i was struggling to get my subjects sharp and in focus. Thank you Rachel for such a great explanation.
Rachel
I’m so glad to hear that Diana! I’d hate for you to get rid of your 60mm, I love that lens. Keep me updated with how your next shoot goes.
DEMIR Ozer
A very successful and satisfying presentation,thanks a lot Rachel.
Rachel
Glad you enjoyed it! Thanks for stopping by 🙂
Meera Seetharaman
Beautiful and information packed post Rachel. I use my 100mm macro 75% of the time and I had some idea about how the lens worked. This post however throws a ton of light into those dark spots I had in my head and answers a bunch of questions. Thanks so much for taking time to put this post together. I can imagine the amount of work that could have gone into making this happen. Thank you. Can’t wait to #shootwithmacro <3
Rachel
You’re so welcome Meera! Thanks for stopping by to read. It did take a while to get up, but it’s such an important point and I am so pleased that people are getting such value from their macro lenses now. See you on IG!
Kylie
I always wondered what I was doing wrong with my macro lens – you nailed it on the head perfectly!!
Mind-blown! Thank you so much for sharing, love your posts and blog! <3 x
Rachel
So pleased you stopped by to read then Kylie! Now you’ll be able to get tack sharp photos!
Brennen Tope
I honestly did not realize how technical shooting food could be. Thank you for the great info.
Rachel
You’re so welcome! Photography is the perfect mix of creativity and science. There is quite a bit of science in any niche of photography. Shooting food sure is an art form!
areeba
I honestly did not realize how technical shooting food could be. Thank you for the great info.
Rachel
Thanks for reading ! Photography is technical no matter what niche 😉
Ernest
Thank you for illustrating this difficult subject with photo images. You made it easier to see and understand than leaving it to our imagination if there were no photos.
Rachel
So glad to hear that Ernest! It is a tricky topic, so glad you found the pics helpful.
Tami
Thank you! Is the parallel line vertical or horizontal? As I understand parallel lines, its lines that don’t intersect. So I guess I am confused on that part. Thanks,!
Rachel Korinek
That’s correct about parallel lines Tami! It is a confusing subject for sure. The best way to think about it is like a ‘plane’ or an ‘area’ rather than a line. If you scroll up to the images you’ll notice, that the ‘plane’ is drawn as a ‘box’ or a rectangular area. So this area will also be parallel to the sensor. So it’s both vertical and horizontal really as it’s an area. Does that help? Let me know if you need more clarification. I know it’s one of those tough subjects to get our heads around. When you see it in action, it starts to click <3
fanis
Thank you so much for this! First time I manage to understand dof and the relation plane of focus and the focus point. The illustrations did the job. Why no one else in the internet is teaching it like that? thank you again!
Rachel Korinek
Hey Fanis! I am so happy to hear that. The diagrams definitely help, don’t they! Now your macro photos will take you to new heights!
Musk Al Mahal
Such a great post, Rachel. Beautiful and information packed post.
Rachel Korinek
Thanks for stopping by! So glad you enjoyed it.
Roy Harvey
I have seem the same rule of thumb about depth of field repeated endlessly… except in this article. That rule is that one third of the depth of field is closer than the plane of focus, and two-thirds is behind the plane of focus. Your diagrams do not reflect this. I am confused.
Rachel Korinek
Hey Roy, we really wanted to focus just on the plane of focus in this article and the diagrams so that we could really hit home this important point about macro photography. These diagrams aren’t to scale, but more to emphasise a point. Are you confused about this post or the one-third rule?
Rania
“Thank you for a highly successful and fulfilling presentation.”
Sana
Thank you for a highly successful and fulfilling presentation.