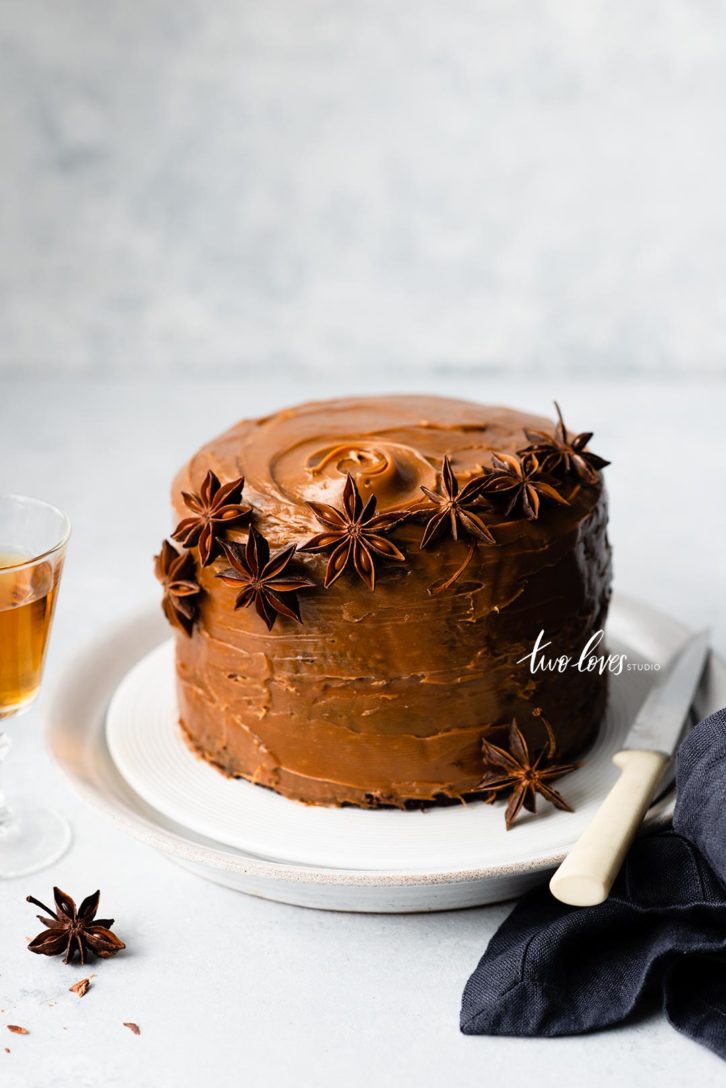
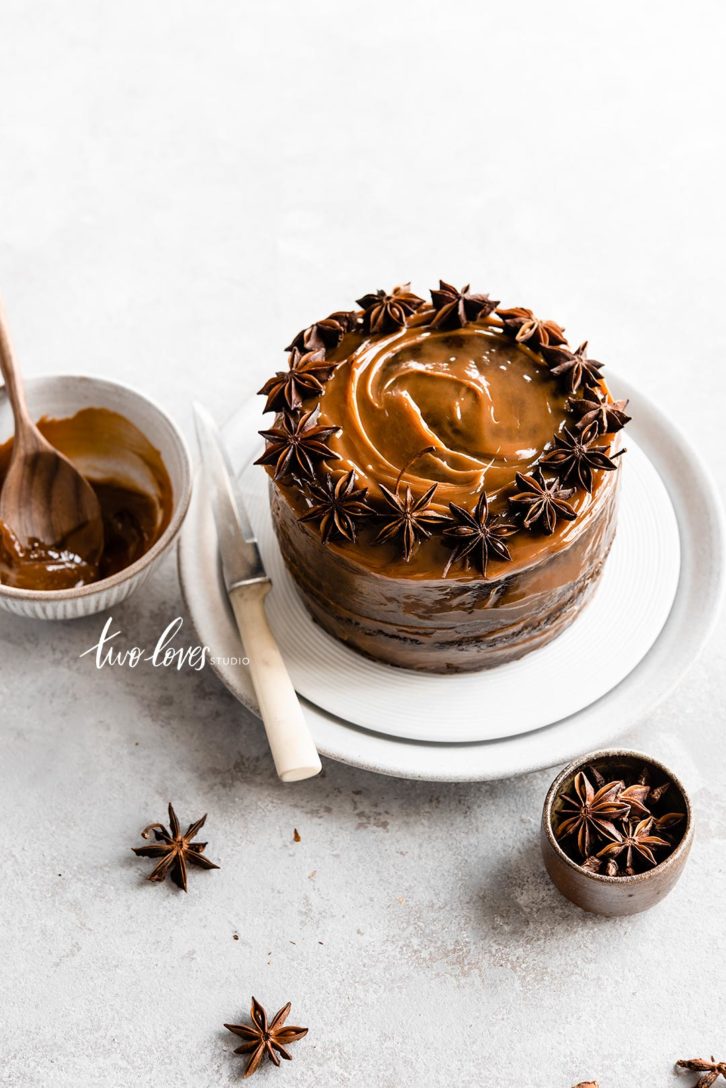
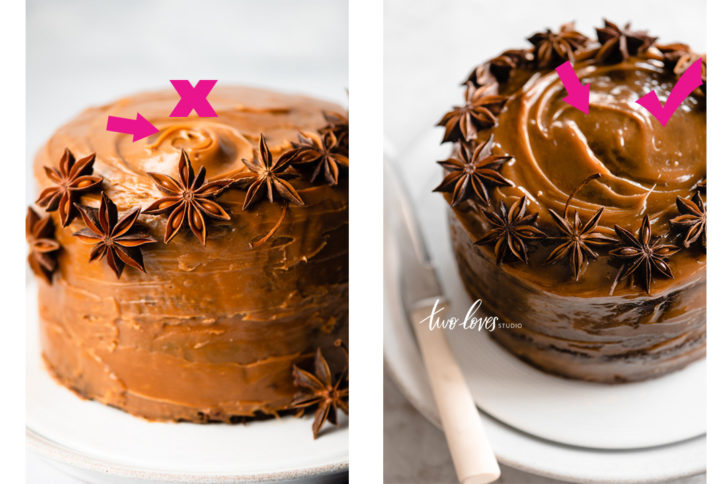
For better cake photography, I went from this to this in just one shoot. Here’s how.
We all have those photos of food that have stopped us in our tracks. Made our heart skip a beat.
Those are our Muses. The images stick with us and inspire us for years.
This shot and recipe by the Donna Hay team is one of my ultimate muses.
Never one to pass up working on my food styling skills, I decided to tackle this recipe in a set of images.
My first attempt was a fail. And I learned so much about just how important the right consistency to get this shot. In this post, I want to share with you what I learned to nail my cake photography on try number two.
It All Hinges on The Right Consistency of The Dulce De Leche
And ain’t that the truth. This cake photography can only shine with the right outer layer.
This was actually the first time I have used dulce de leche, (shock horror!), so I wasn’t sure what to expect.
And the thing is, this recipe was designed by a team of recipe developers in Australia.
One of the biggest things I’ve noticed from moving countries, (and hemispheres), is that ingredients are different and sometimes non-existent.
It’s hard to know what the right ‘store-bought dulce de leche’ is. As the recipe called for pre-made rather than making it yourself, you don’t really know what consistency they need.
That was the biggest challenge about this muse.
I had trouble, at first, actually finding pre-made dulce de leche (mostly cause being new to Canada, all the brands are new).
And the one I did find was like water. Which brings me to my next point.
The Right Consistency Needs to be Spreadable
The first attempt of dulce de leche was a bit of a fail.
The brand of store-bought was super runny. Opening the can, I realised it was more like something you would pour over a cake to get drips down the side.
The consistency was super runny and I knew that I would have to be thicker if I was to spread over the cake.
I knew that I had to thicken it up, but as I haven’t worked with it before, I ended up thickening it too much.
It turned into a hard blob once cooled. Spreading it was very challenging when not hot.
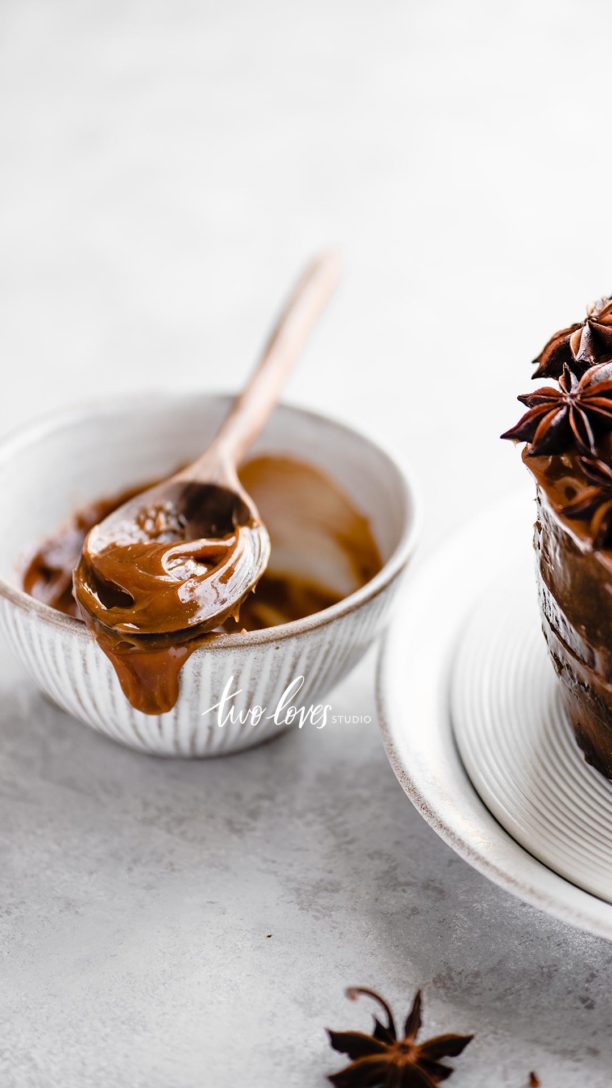
The right consistency needed to be more like a ‘spread’. Something in the ingredients list that made it thicken enough to hold its own, while still being spreadable.
So I hunted down a pre-made dulce de leche spread.
The benefits is that it was thick enough to stay on the cake, but spreadable so that it could be applied liberally over the cake in layers.


The Right Consistency Gives Specular Highlights
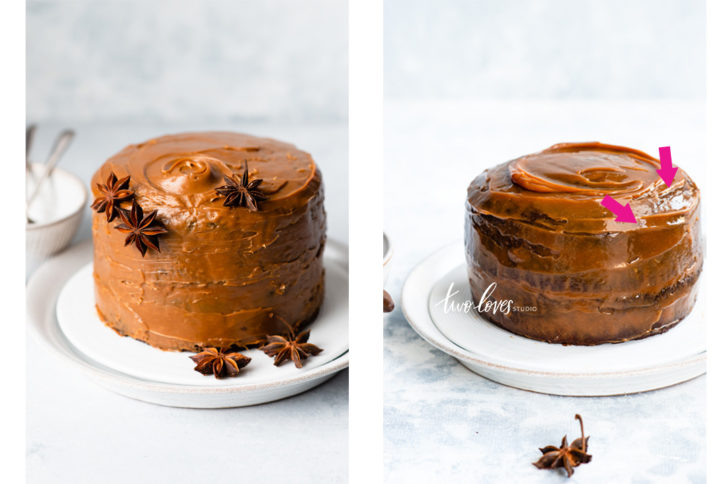
The ‘spreadable’ nature of the dulce de leche is not only necessary to actually be used on the cake, but also to pick up highlights.
When the dulce was too thick it sucked up all the light and made the cake into a heavy blog. It lacked dimension and sparkle.
So not only was the first attempt hard to style, but it didn’t pick up the light as well as the second attempt.
The beautiful shine comes from a combination of the dulce not hardening.
It’s these specular highlights that brings a two-dimensional subject to life. And to do that, there are a number of factors that come into play with these highlights.
The Direction of Lighting Can Make or Break
Sometimes when we challenge ourselves with new subjects, there are so many new elements we are trying to cover that we can fall back into default mode.
It’s kinda where I fell the first time with this shot. I defaulted to side light as it’s the most common type of light used in food photography.
But the light wasn’t as strong from this angle with this subject.
I needed backlight to help bring out the shine, specular highlights, and all-round magic.
Whilst I ended up settling for something in-between side and backlight, there are backlight qualities here that bring out the specular highlights.
For more of my lighting tips and secrets, buy my ebook here.
The Angle That is Most Powerful in Cake Photography
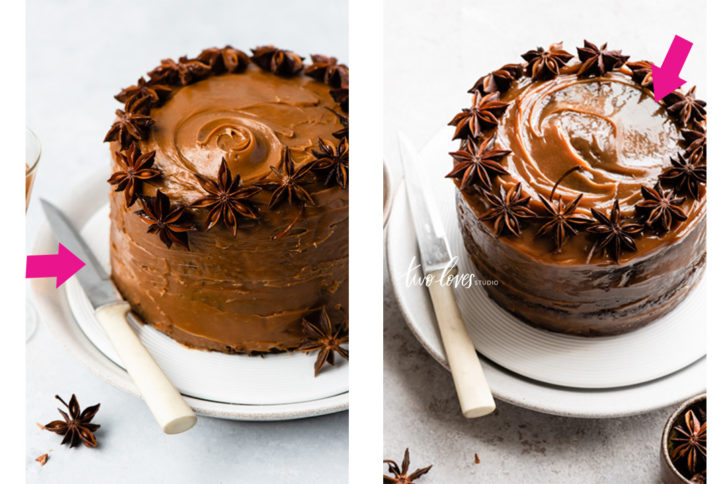
Not wanting to completely create the same shot of this recipe, I tried to shoot another angle.
But the angle is the most powerful when it captures the top of the cake, but also the front.
The straight-on angle was good, but it wasn’t the hero.
In the first attempt, I was stuck on the fact that the cake looked like a big blog sucking up the light.
I didn’t explore the angle as much as I knew I would have to shoot this cake again.
Changing the angle to something around 45-75 degrees was more flattering to the cake and it’s elements.
Create Realistic Swirls, Always
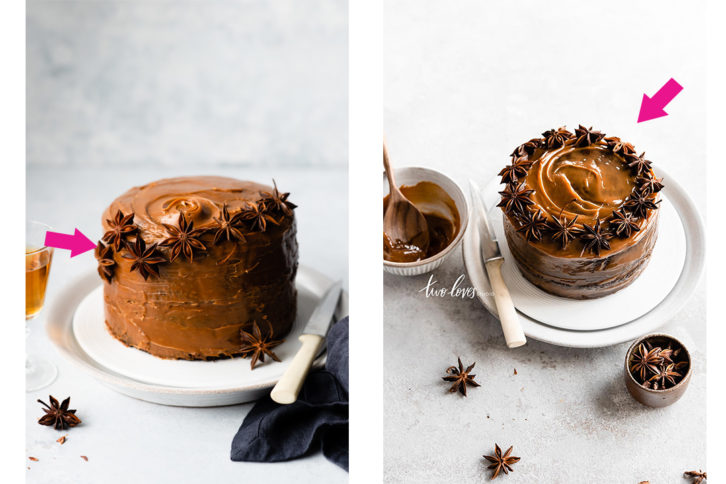
As the dulce de leche was too thick and went hard quite quickly, I wasn’t able to get realistic and flowing swirls.
The swirl I did get reminded me of something ‘me four years ago’ would be proud of.
I knew it was forced and unrealistic.
The consistency of the dulce the first time wasn’t giving me the flow and effortless feel the cake required.
Thinking back to my days of styling food for packaging, I knew that an art director would say this isn’t effortless enough.
And it would need to be redone.
Again, making this shot better came down (again) to the consistency of the dulce.
The second shot’s swirl is effortless. We can get lost in it. It feels like it belongs.
It really adds to the strength of the second shot and improved my cake photography.
Thin Layer For Deep Colour + Texture
The other reason the first cake looked completely different was what the thickness of the dulce did to the colour and texture.
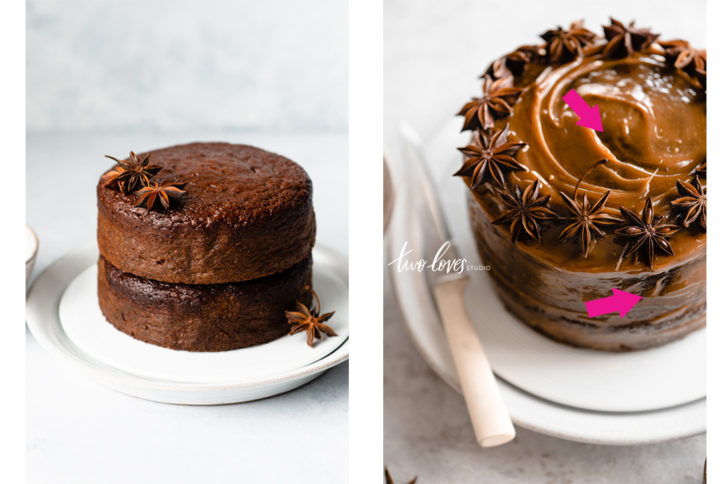
As it was thick, the thick layer didn’t reveal how deep and rich in colour the cake underneath was.
The cake was actually very dark. Spiced sticky date in a deep, rich brown and caramel hue.
The incorrect dulce totally covered this up. And it’s actually a very beautiful feature of the cake.
In the second shot, a thin layer not only revealed the cake colour, but it allowed the texture to show through.
Which is an important feature of the cake. You want to show the viewer what to expect when they take a bite.
Fresh Eyes + Mind
It can be a total bummer when something we work hard on fails. Especially when it comes to food photography.
Usually to bake a cake it takes hours, and when it doesn’t work out, food gets wasted.
But when something doesn’t work, it’s an opportunity to learn what didn’t and do it differently the next time and improve your cake photography.
Breaking down a set and starting again can really help with creative blocks.
Coming back to the shot the second time around, I knew that I had to stay away from what I did the first time.
Don’t do the same thing over and over and expect different results.
So knowing that a different angle, different lighting, with different styling was how I was going to get a better shot.
The Recap – Cake Photography: What I Did Differently That Worked
To get a better cake photography the second time around, the steps I took were:
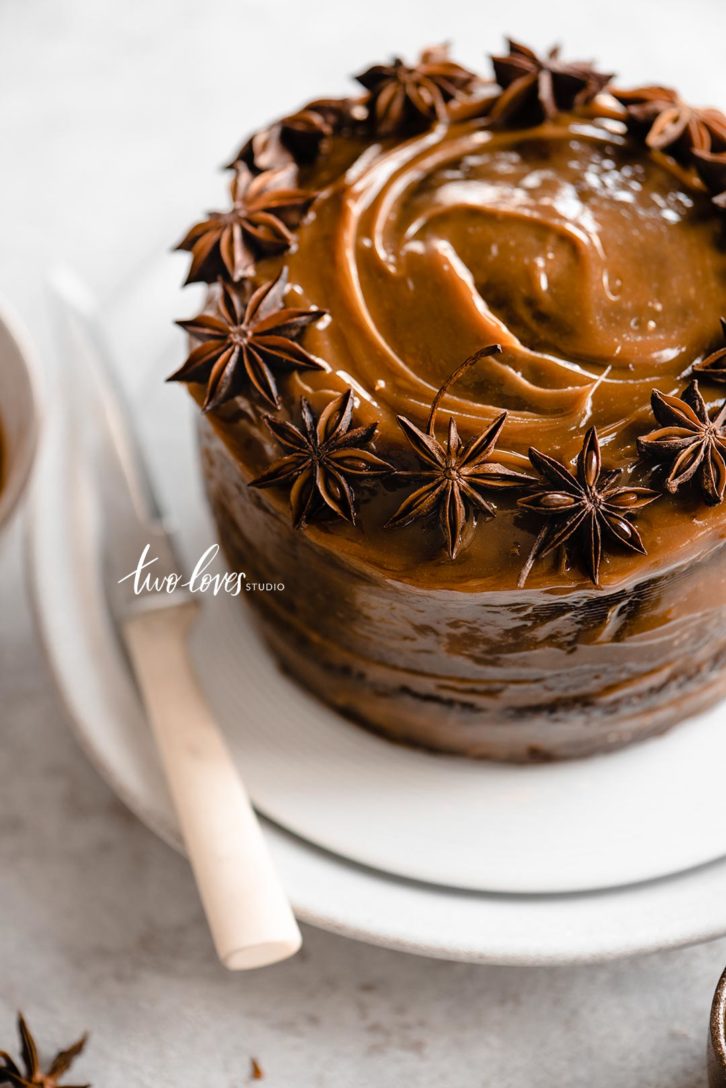
- Changing the consistency of the dulce de leche to be more of a ‘spread’ changed nearly every aspect of this shot.
- A more spreadable dulce allowed the specular highlights to give the subject dimension.
- Changing the direction of light so that the highlights were being picked up.
- Trying an angle around 45-75 degrees allowed me to get the hero angle.
- A thin layer of the dulce allowed the cake to be a truer, richer and deeper colour and reveal texture.
- Coming back to the shoot the second time and NOT doing anything I tried the first time.
Redoing a shoot can be hard. We have a lot of emotions about it, wasting food, time and money. But shooting something again is a great exercise in learning what doesn’t work. It’s one of the best ways to improve your cake photography.
Only by learning what doesn’t work can we learn what does.
Try re-framing a reshoot into something that is powerful. Note down what you need to change and implement that the second time around.
Have you ever shot something twice? What was the biggest thing you learned?


Jonathan
Great walkthrough of troubleshooting your own work. Especially as it’s easy to think we create a cake, or whatever, then just rock up with our camera and boom! The killer shot is done.
In styling, shooting, lighting and editing there can be a million tiny tweaks to get to the final shot. In fact, if I get that shot 1st time I’m kind of suspicious that it was too easy. Unless its a restaurant dish by a crazy talented chef who creates art on a plate. Even then, you don’t always nail the hero shot right out of the gate.
I have a question Rachel. When you’re shooting on a given day, how do you warm up your photography eye to get ready for the day’s shoot? Do you go in cold or perhaps grab a few process shots just to get your eye in?
Thanks for your awesome website.
Cheers, JT
Rachel
It’s so true JT! It’s all about the tweaking and slight adjustments. That’s why it can take the longest time to get a shot. And really I just worked on getting this one shot. I do like to work for it as well. I just have to play. The shots at first never come out that good. I have to play with props and lenses, like a warm-up really. Then cut it all back.
Sveta
Thank you very much for the story, this is very instructive, I like all the photos, including those that you call non-heroes)
Rachel
Thanks for stopping by to read Sveta! I am glad you enjoyed it. I know, it can sound like I am a perfectionist by saying these are non-heroes. Because they are ok. really. But we are all at different stages, and to settle isn’t how we learn.
Janina
Rachel,
thank you so much for sharing this with us. Remember the pictures I posted in the Composition Essentials Facebook Group last week?
I kind of had the same problem. Not with the Dulce De Leche obviously but the cake, the props… it didn’t work out. And I was so bummed because in my head I had it all figured out.
Oh my was i frustrated. Two years ago I would have been extremely proud of that first shot.
So I got up the next day, baked another cake and started over. Stepping away from the composition I had in mind, trying something different and exploring light.
And I was really happy with my second try.
And you know what? It feels so so good to know that even you as a pro sometimes struggle to get exactly what you had imagined. But you try again.
Thank you so much for sharing!
So happy to have found your Blog and everything that comes with it i.e. courses, insta etc.
Have a great day!
Janina
Rachel
Absolutely Janina! I thought that when you posted it. I was like, I love this. But I get it. It’s not quite what we had in mind. And when we have experience, it’s sometimes hard to think we didn’t nail it the first time. But the second shot you posted blew my mind. It’s gorgeous. That would be a cover of a book. I hope you really see the value in how awesome your creativity is. And I agree, it’s nice to see that others are human. I feel the same when people I look up to share that things aren’t always easy. Thanks for taking the time to share that. Very valuable xx
Matt
I think it’s so cool to se your thought process of how you turn a shot that you’re unhappy (or even indifferent to) into one you’re proud of. It’s the mindset and approach that make the difference!
Rachel
Definitely! The mindset around it can make or break it. I am slowly learning to just accept that sometimes, things have to be done twice! Thanks for stopping by.
Cindy
Rachel, this post is so timely for me! I spent 6 hours yesterday baking and shooting a Cara Cara Orange Pound Cake. (Cara Cara oranges are a lovely pink colour inside).
Sadly, the pretty pale pink glaze I drizzled it with was shiny when I first applied it, but it dried quickly to a matte finish and I could not get the specular highlights I was envisioning.
I also was not thrilled with side lighting or my angles. I went to bed resolving to reshoot this weekend, and research how to keep my glaze shiny. I’m thinking that the addition of corn syrup would help.
The cake tasted fantastic and my chief tester and bowl washer was thrilled. He took the leftovers to the office.
Thanks for all the tips and inspiration. I will work on trying backlighting and exploring different angles. I appreciate your taking the time to share your failures and successes with us. Mistakes are how we learn.
Rachel
Yes Cindy! Totally, just that little change to backlighting can make all the difference. I hope you can find what you’re looking for. I’d love to see the cake it sounds wonderful. Happy to know what you are striving for excellence 🙂
Charlie
They really are great tips. I love reading about how far photographers have come, especially when it comes to product and food photography.
Rachel
You’re so welcome Charlie! It’s great something I think more people should do!
Hina
Hi, can you share what type of kind of backdrop you are using? Your pictures came out amazing!
Rachel Korinek
Thank you, friend! I actually made these myself. You can checkout this tutorial I have on the blog on how I did it.