This post may contain affiliate links from products and services we love and trust.
Your setup for food photography starts with light. Photography can’t happen without it. Photography is painting with light.
Lighting is the most important lesson in photography. So if you feel overwhelmed with all the things you need to learn, this is crucial. If you can master it, you’ll produce beautiful imagery.
In this photography fundamentals lesson, we will look at the basic setup for food photography, plus introduce a few basic lighting concepts.
This is all you need to get started.
The Basic Light Setup For Food Photography
Firstly, I’d like to say that I don’t particularly like the word ‘basic’ as it implies that nothing great will be achieved. But that’s not always the case.
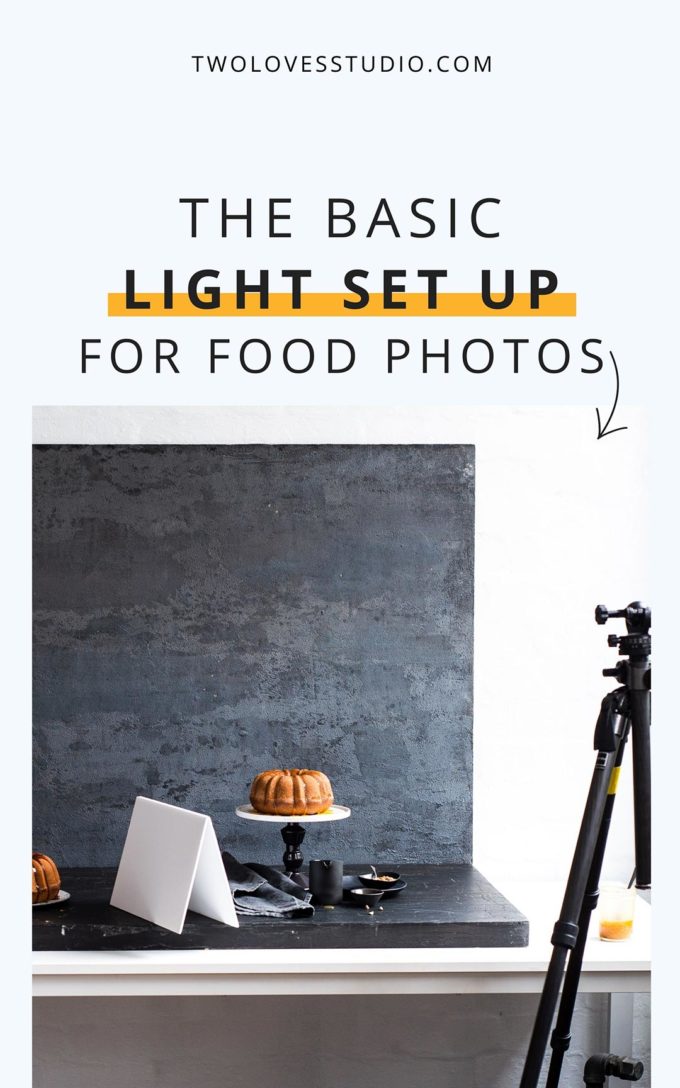
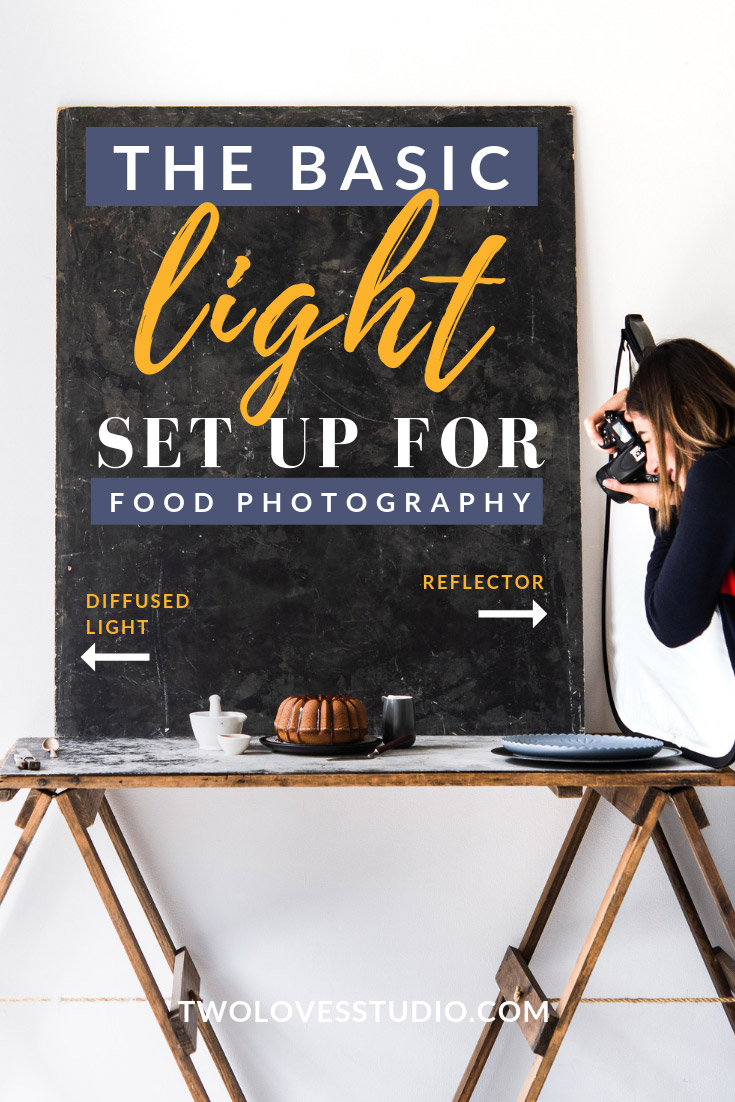
This is a foundational setup from which you start to expand your light manipulation skills based on the mood and story you want to tell. The basic setup for food photography to produce the soft light common in our niche is:
- Sidelight – the light source is next to your scene
- Diffuser – a placed between the light source and your subject
- Reflector – is placed opposite the light source to ‘reflect’ some light back onto your subject and scene.
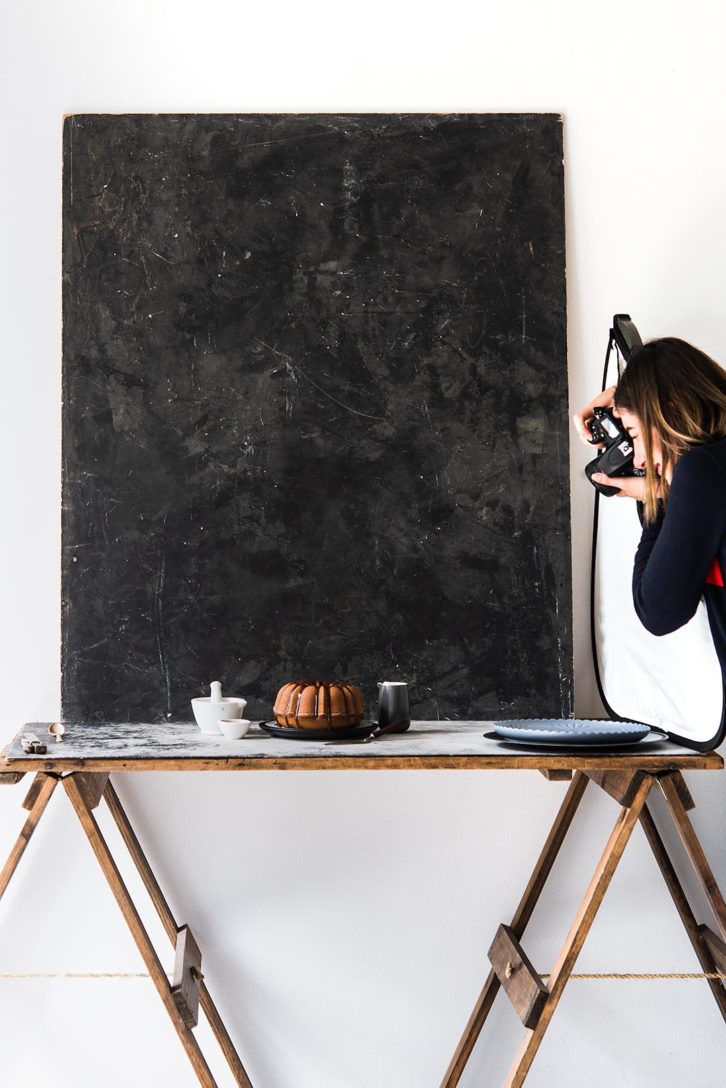
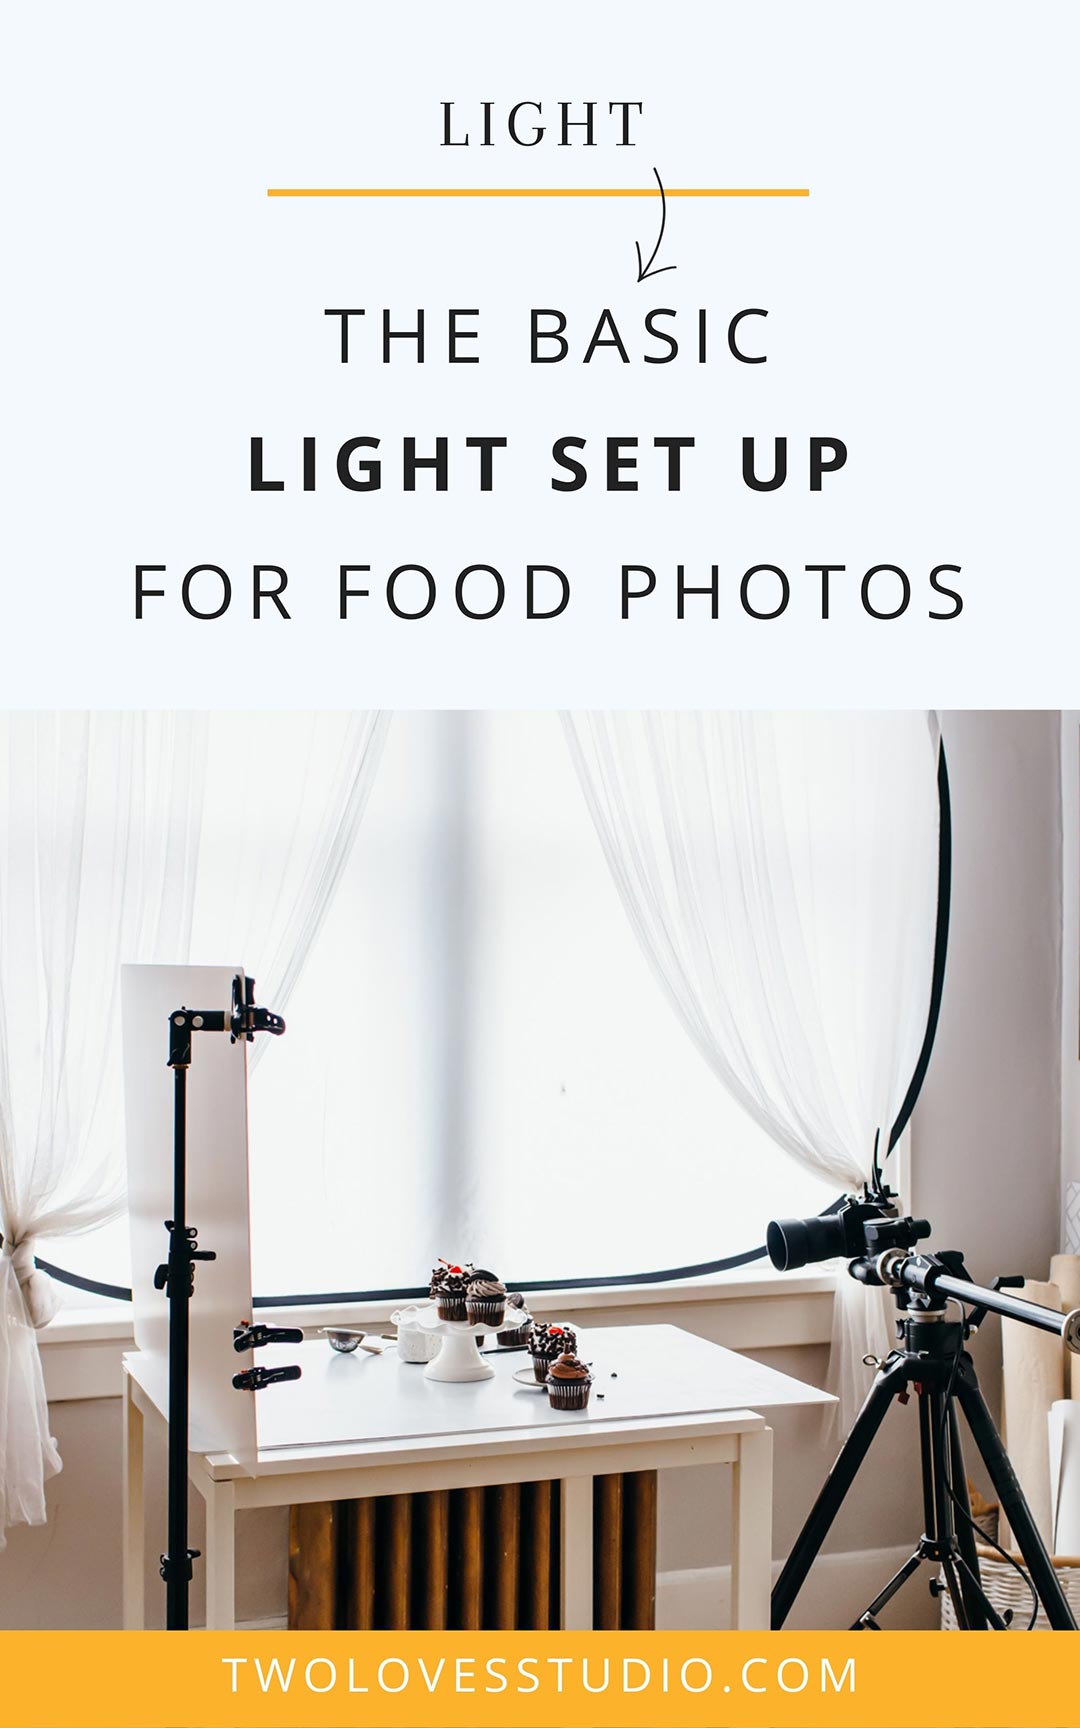
You will place your setup so that it is next to a window, with the light falling onto your setup from either the side. So your subject and the camera are next to the light source.
Next, you’ll place a diffuser between the light source (your window) and your subject. This will ‘diffuse’ the light to make it soft – we’ll cover this later. At first, place the diffuser closer to the window than to your subject.
Finally, if you need to light your subject more evenly, you’ll place a reflector on the other side of your scene to ‘fill’ your shadows. This will be your foundational setup. Once you get the hang of this setup for food photography, you can then start to explore more light manipulation.
If you want to see more behind the scenes setups for food photography, case studies and how to create beautiful images with natural light then grab my ebook.
Basic Light Modifying Aids
Let’s get down to the bare minimum of what we need in order to manipulate natural light, shall we?
The first two light manipulating aids that you should source is, a reflector and a diffuser. You can even get both of these in one and there are some cheap combos on Amazon. They look like this. Where possible, it’s best to get as large as you can afford.
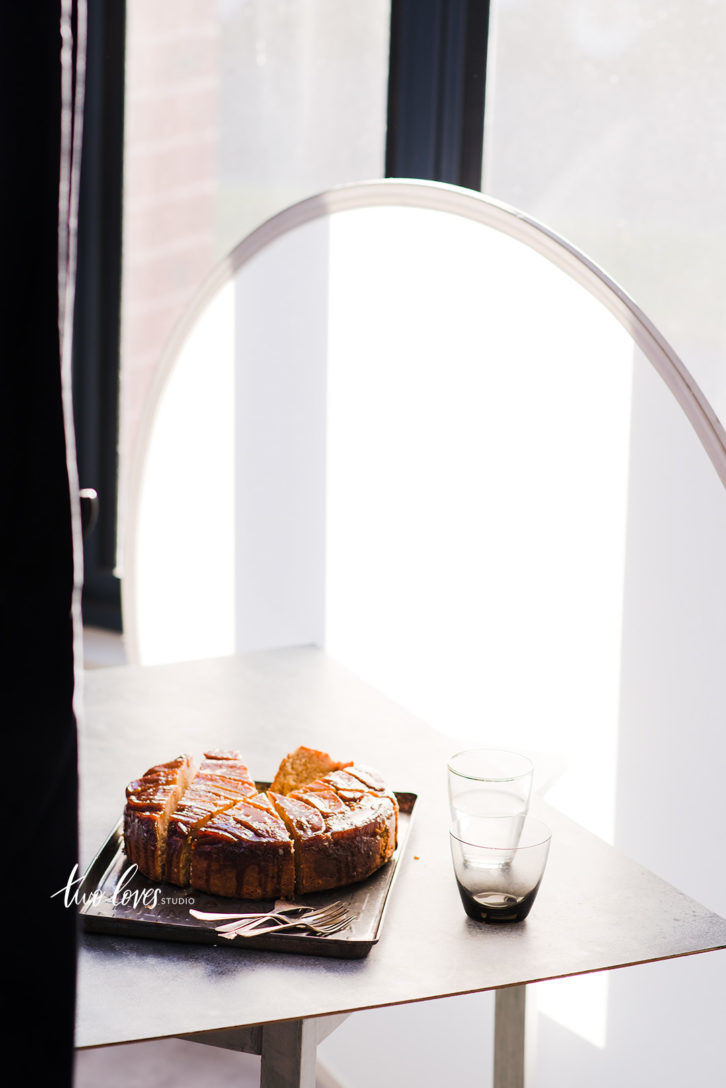
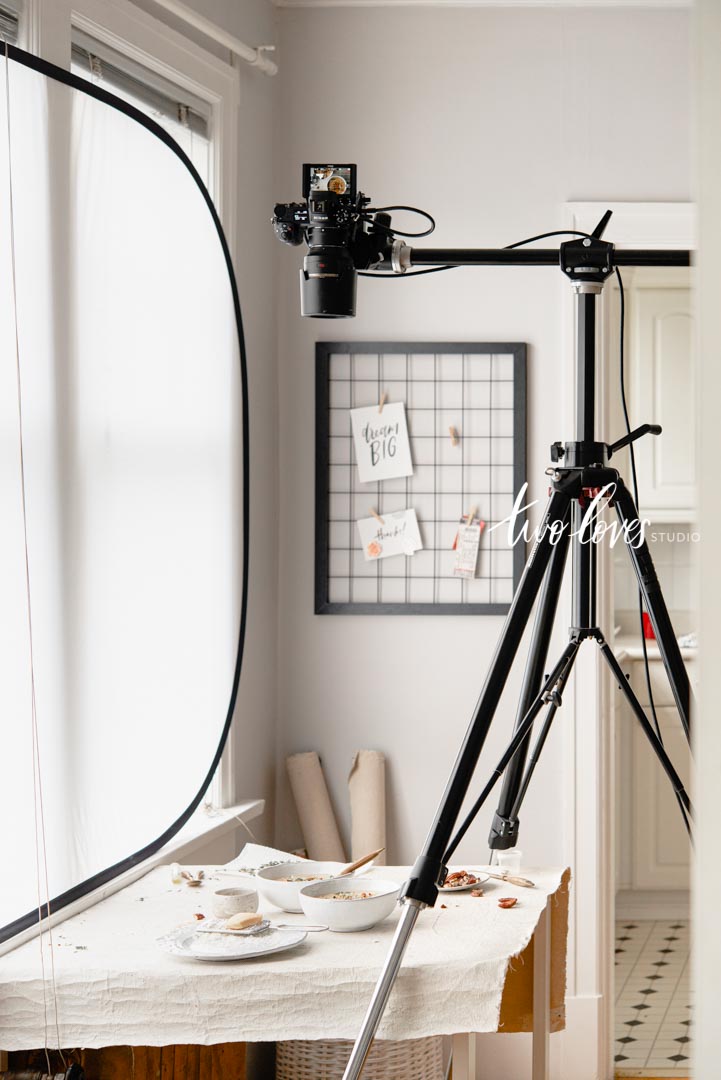
A diffuser is something that diffuses or distributes light more evenly onto your subject. Diffusers should be placed between the light source and your subject – just like this:
A reflector bounces light from the light source onto the subject. This is what is known as fill light. Reflectors typically are placed opposite the light source.
Any reflective surface can be used, from white foam boards to reflective metal or metallic surfaces.
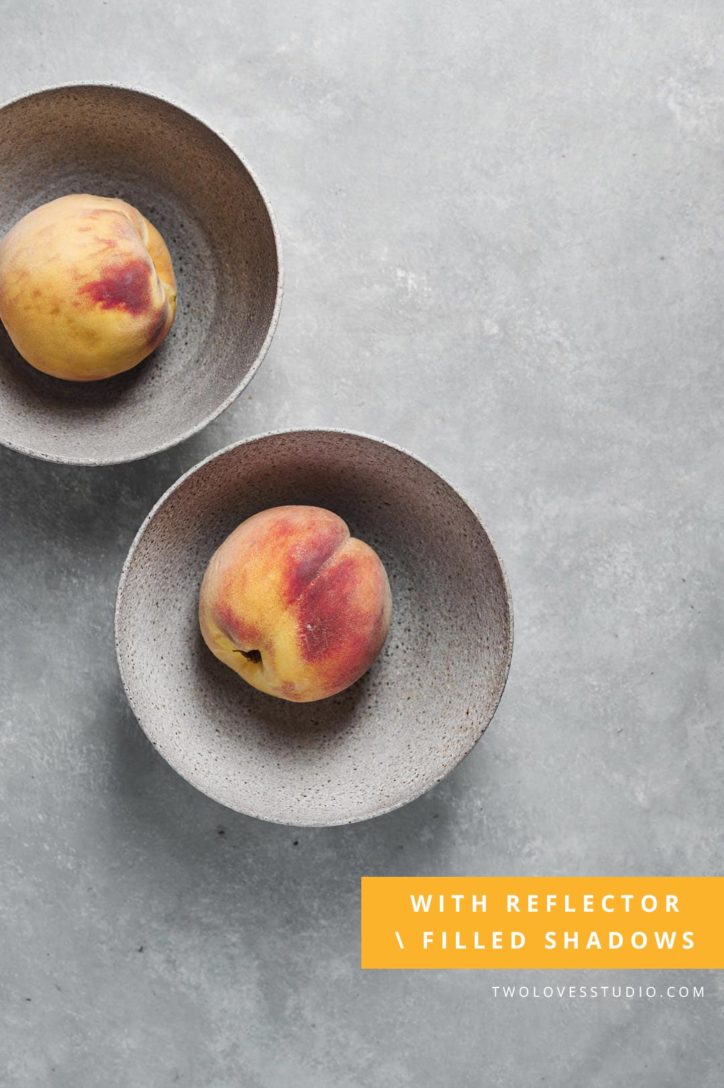
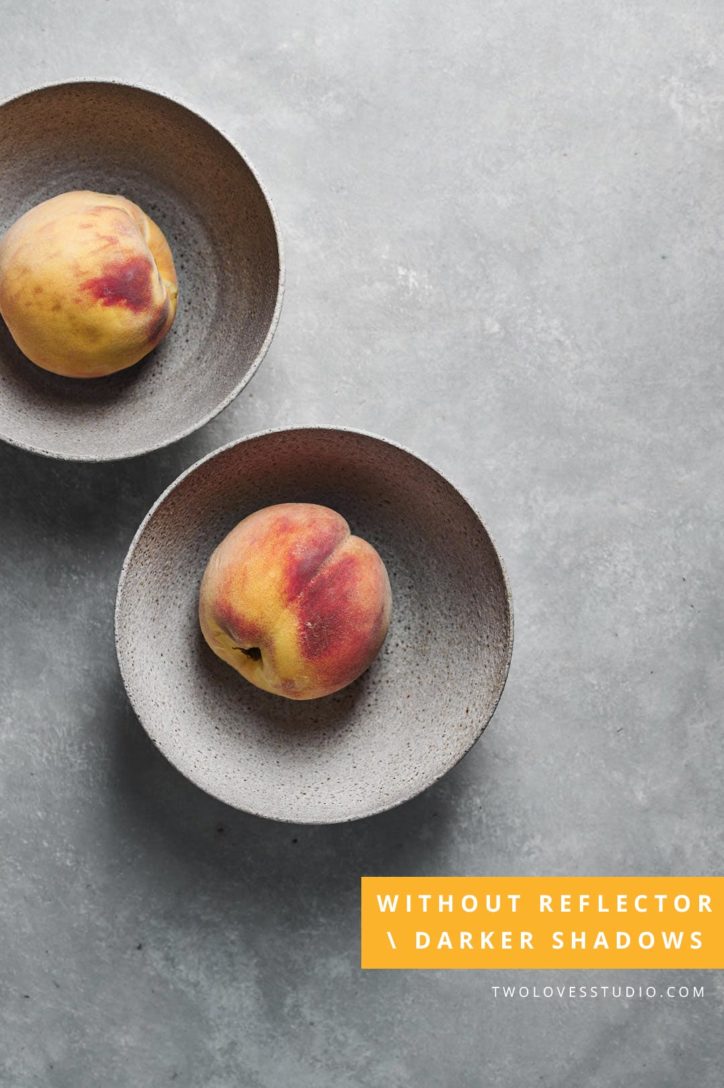
Here’s what happens in the camera when we use a reflector. The shot on the left is with light being reflected onto our scene. The shot on the right is without light being reflected onto our scene.
Neither is right or wrong, just different. Take a moment to feel the difference.
RELATED: How To Manipulate At Home
Shop Basic Lighting Gear
For under $100 you can get everything you need for a basic lighting set-up for food photography.
As a professional, I own all of these diffusers, but if I were to recommend one, I would get the Neewer 40″ x 60″ as I also use it with artificial light.
For on location and a portable solution, I like the Neewer 24″ with handle.
You can’t beat getting white and black foam core to help shape light. I use it all the time, pairing it with these handy cheap clips to stand them up.
Most Common Type of Lighting For Food Photography – Soft Light
Now we have the basic setup for food photography and a few modifiers we need under our belt, let’s look at types and direction of light.
The most common type of light set up for food photography is created to capture soft light. It’s used most often because it’s complementary to light food.
It illuminates the texture and details in food while revealing form and dimension.
Soft light is characterised by soft shadows. Soft light can be used for any mood. You can have bright and soft light or moody and soft light. Now ‘soft’ is not synonymous with light or dark shadows. Soft shadows can be both light and dark. What makes them soft is their ‘soft edges’.
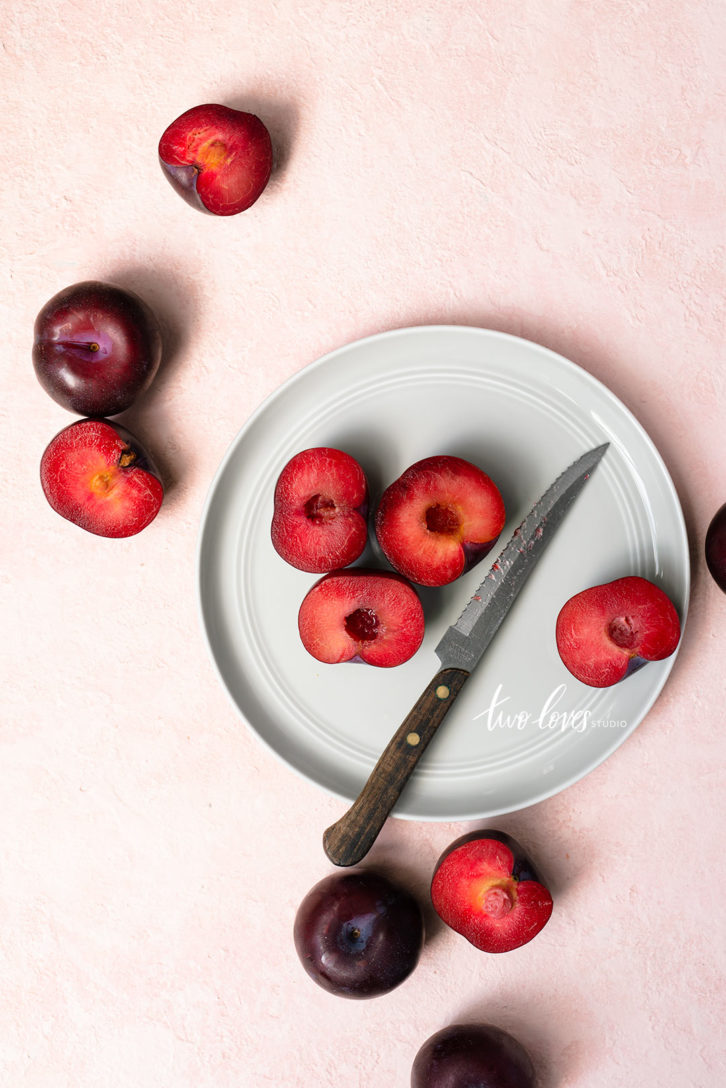
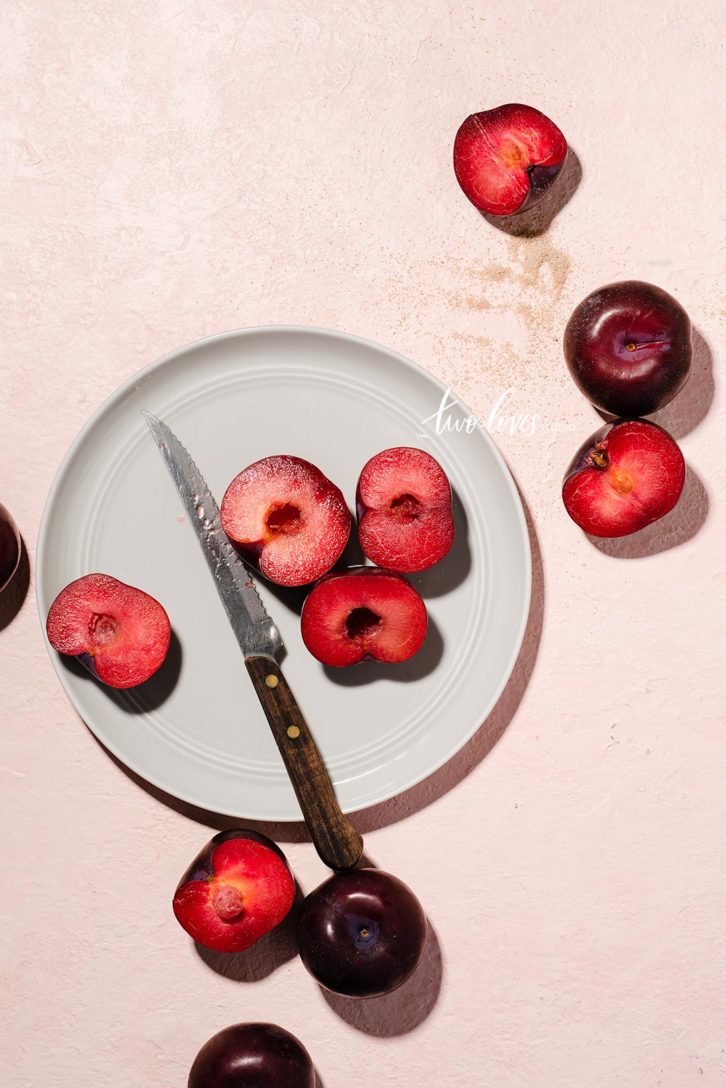
Can you see the difference between the two shadows above? The shadows in the image on the right are ‘soft’ (produced by soft light) and the shadows on the right are ‘hard’ (produced by hard light).
Now that we know the most common type of light used in food photography, let’s look at the two main directions of light.
The Two Main Directions of Light: Back and Side Light
The two main directions of light used in food photography are side light and backlight.
They are pretty self-explanatory, but let’s cover them quickly anyway. Side light is where light comes from the side of the subject and your camera. Backlight is where the light is coming from behind the subject and opposite your camera.
Sidelight works really well for nearly all setups for food photography. W
hich is why it’s a go-to for many food photographers and a great place to start.
Let’s see those visually.
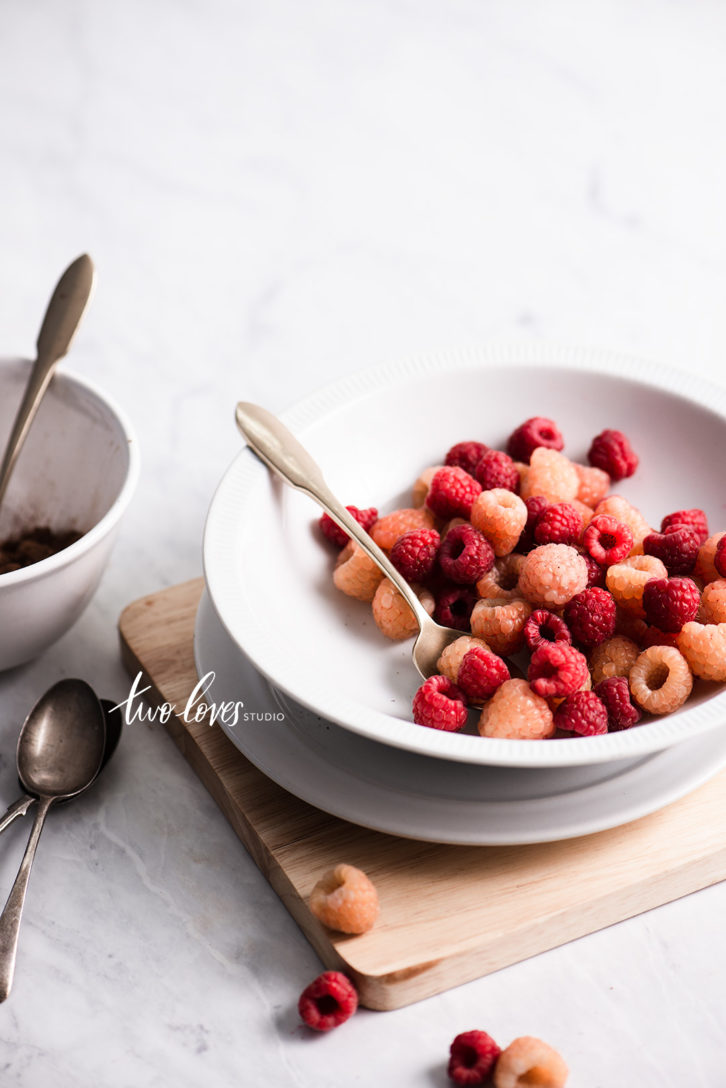
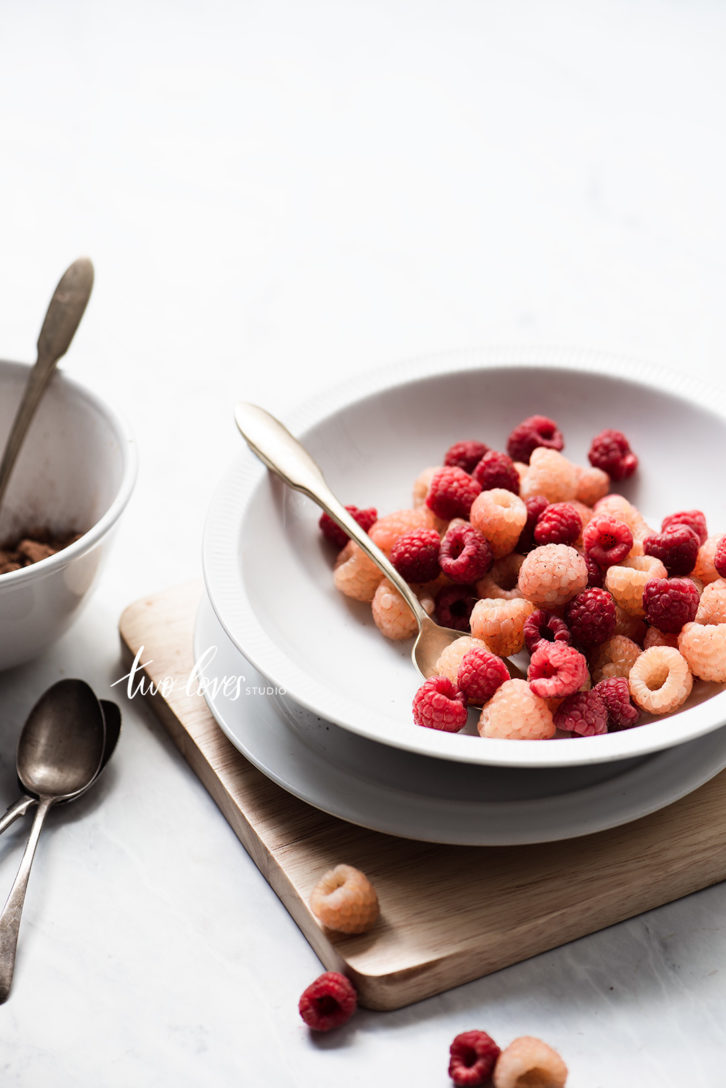
Why is this important? Take a moment to see how the light shapes the subjects in the images differently.
RELATED: 8 Tips For Embracing Low Light Food Photography.
Time of Day Affects Light
You’ll mostly know from just being alive that the time of day also affects light. From sunrise, to midday, to sunset and twilight. The light is of different intensity, different direction and has a different feel.
Gosh, even the seasons bring about such different light right?
If you’re shooting natural light, it’s important to know the difference.
This is why there is a common exercise you’ve probably read involving photographing a bowl of fruit at different times and different places in your house.
It’s a very powerful exercise and it works.
If you think about your home, think about how light changes in different rooms. Are there rooms that have bright light at a certain time of day and others that are dark?
One of the simplest and most powerful things you can do is understand how the light changes in your shooting space. So why not check every hour to see how the light looks and note down the differences throughout the day.
The Recap
In a nutshell, here are the takeaways from this post:
- The foundational light set up for food photography involves placing your set up next to a window, with a diffuser in between your light source and the subject. Placing a reflector opposite the light source.
- You’ll want to have a diffuser and a reflector as staple light manipulation aids.
- The most common type of light for food photography is soft light.
- To two directions of light to craft are side light and backlight.
- Time of day will produce different kinds of natural light.
- Watching natural light change throughout the day and from day to day, season to season will help you see the diversity.
Lesson Activity
For this activity, you won’t use a camera. I don’t want you to be worried about your settings or what you’ll be shooting.
I just want you to ‘feel’ and ‘see’ the light.
The next time you have a full day at home, I want you to:
- Set an alarm on your phone for each hour on the dot.
- Each time the alarm goes off, walk into each room in your house that has a window. Even the garage or shed!
- Look at the light. Feel the light. Ask yourself these questions
How strong is the light?
Are there any shadows you can see?
Is the light coming through the window?
What direction is the window facing?
What time of day is it, morning, midday, afternoon, evening?
Does the light have a colour to it?
How does the light make you feel?
Doing this two days in a row will be especially helpful and allow you to see that light changes with weather and season.
If you’re taking Photography Fundamentals 101, click here for your next lesson.


Sharon Rausch
I found your blog by chance. It’s amazing great effort. Thank you so much.
Rachel
Hey Sharon! That’s amazing. Thanks so much for stopping by the read. Hope this post will help you with your lighting for food photography.
Sarah
hello! where do you get your super backgrounds?? the big black one and the charcoal one! 🙂
Rachel Korinek
Hey Sarah! There is a mixture in this post. Some are mine and some are rentals. When I hosted workshops back in Australia, I rented a space and they had backgrounds. I believe the one you’re referring to was part of the studio’s collection 🙂 Sorry that wasn’t as helpful as knowing the direct creator of the background.
Alvin
Thanks for taking the time to write the article. Some good points on here for somebody new to photography. However, it feels more like an intro to photography and light and not too much discussion on food photography specifically. Also, when you ask the reader to buy your ebook after every other paragraph it becomes a hard sell. Such a shame when you have good content to start with.
PS. The Northern Hemisphere starts just a little north of Bali and includes, among others, the entire Caribbean where the sun shines all day.
Rachel Korinek
Hi Alvin, thanks for stopping by and sharing your feedback with me. If there was something you’d like to have seen me cover in this post, let me know. I might have another post where I cover what you’re after that I can share with you 🙂 Take care and happy creating.
April Saunders
Hey Rachel,
Thanks so much for this article. Your description and image of the “hard light/dark shadows” was just what I was looking for. I knew I didn’t like this recent picture I took but couldn’t put my finger on WHY and when I saw your shot with the plums, I knew that was my problem: the hard light. I think I’ll invest in a diffuser?
Thanks again!
April
Rachel Korinek
You’re so welcome April! A lot of people incorrectly call ‘hard’ shadows ‘harsh’ but that’s a description rather than a type. Just as light can be ‘beautiful’, ‘harsh’ is a personal preference. Being able to recall the names for types of shadows is really helpful as you can then be aware of what types of shadows you are drawn to! A diffuser when you have hard light outside of your window is a great idea. Let me know how it works out for you.
Andrea
What diffusor and reflector do you use?
Rachel Korinek
Hey Andrea, I have a couple but if you can swing the size, I recommend getting this one: Neewer 40″ x 60″ https://amzn.to/2O3mOSp. The other size that I have is this one: https://amzn.to/2RVhXCO. I will make sure to update the post so that these links are easier to find 🙂
Kannan Kasturi
Horrible. No mention of recommendations for artificial lighting sources
Rachel Korinek
I’m sorry you didn’t enjoy the post Kannan. It’s focused on natural light. If you’re looking for an artificial light blog post, let me know and I can point you in the right direction. Cheers!
Claudia
Oh my goodness Rachel, it hurts me to see such a comment (The “horrible” one), reminds me of the Subpar Parks by Amber Share (@subparparks on Instagram), where she turns into art 1-star reviews of the most beautiful parks in the world. You are such a great teacher, motivator, and artist. I will never forget how a few of your podcasts motivated me to start my own venture a few years ago. Just wanted to say thank you. xx
Rachel Korinek
You’re so kind Claudia! I try not to take the words of strangers on the internet too seriously! I do know Amber’s work. It’s pretty hilarious the reviews people leave on some of the most stunning parks! Thank you for dropping by with a little love bomb for me. Right back at ya xx
Kevin B
You must be really stupid. You should have figured this article was focused solely on natural light. If you want free resources there are plenty on the internet. If you don’t have a kind word the least you can do is to zip it.
Josh Houghton
Hi! Awesome blog post. I’m completely new to to food photography. Fell into it by accident and trying hard to learn everything I can.
My main question is that what do you do when you have no natural light. Well, basically my house has horrible lightening even when next to a window. And taking shots outside isn’t an option as my setup is in doors.
I just purchased some nice backdrops, plates, bowls. Is there a type of artificial light source I can buy? I just don’t know what to purchase?
I have a small space but will buy whatever you recommend.
Rachel Korinek
Thank you Josh! I’ll bet that you could find some nice lighting in your house. It’s hard to quantify ‘horrible’, and you’d have to give me more context. Is every window in your house bad? Again, let me know what ‘bad’ means. I’ve taken photos in many countries and in many different situations, and there is also something we can do to create better natural light. Personally, I think working with natural light is better starting out. Because if you don’t know what natural light looks like, it’s hard to recreate natural-looking light with artificial lighting. But if you want artificial, I can recommend you seek out Joanie Simon and her resources. She has some great budget options you can find here: https://thebiteshot.com/artificial-light-gear-guide.
I personally have the Profoto B10, and it’s not the cheapest.
Maddie
Loving this blog, Rachel. I’m getting into my food photography and just love learning about the different kinds of natural lighting – it’s a real skill! Can’t wait to apply your advice 🙂
Rachel Korinek
Hey Maddie! You’re so welcome! Thanks for stopping by.
Nafees Hafiz
Hi Rachel, What’s the material of that black backdrop?
Rachel Korinek
Hi Nafees! This was a painted wooden board that I hired at the studio I was shooting in. It’s nice isn’t it? You can get similar textures and feels from companies like Woodville Workshop.
Manish Rajput
Pendingi have read your blog it was amazing where you have been mentioned about indian photography inforamation. thanks you so much for this assesntial information.
Rachel Korinek
You’re so welcome! thanks for stopping by!
Aiysha
Hey,
I’m looking to start doing food photography for my business. This blog post has been really helpful. I really need to improve my photo quality. I’m using my phone at the moment but I’m going to invest in a cannon camera. My question is I have two rectangular artificial light and I just want to know how to set them up. I’m also going to use the natural light as well using your recommendations 🙂
Rachel Korinek
Hey Aiysha, I am so happy to hear that! It’s not as easy for me to say how to set them up, as it depends on so many things. Like the light power, the size of your subject, how large the softboxes are, and what mood you’re going for. I’m sorry it’s so complex! My best advice is to start close and slowly inch by inch move further away and take shots the entire process and see what looks best. Good luck! Such an exciting time for you.
Adam Johnstone Photography
good informative post
Mel
I found this really helpful and followed you on Instagram to learn more! Thank you so much.
Rachel Korinek
You’re so welcome Mel! I hope you’ll keep coming back to learn more about food photography! X
Zachary
Thank you very much Rachel. This article is very helpful and I appreciate the links to the diffusers and such too. I have saved this article for future use and look forward to reading more.
Zac
Rachel Korinek
So glad Zac! Diffusers are so helpful and I love the large one I have. But it is good to have a few sizes.
Felix de Vega
Your blog is full of treasures! I will take into account the direction of the light for the next photos, thank you!
Rachel Korinek
Direction can be really important! Let me know how you go.
tatty
useful article!
Rachel Korinek
So glad you found it useful!
standoutedc
NICE & INFORMATIVE BLOG
Angela Kalista
Thank you for such a great article. Love the details how you explain the direction of light. Really makes me want to start trying out food photography.
So far I’ve done portraits and weddings but looking to expand.
Stephanie
Thank you, so much for creating this post. I’m new to photography, and I’m trying to learn how to take great photos for my blog recipes. This certainly helped me get a better understanding for the lighting, which I struggle with. Thank you!
car parking multiplayer
Loved this post! I’ve been struggling to get good natural light for my food photos and this guide was super helpful. Can’t wait to try out the tips and tricks you shared!
Rafa Sosa
Deseo este libro
Fred Rogers
THANK you! I try to learn at least one new thing each day and the way you used different sizes of diffusers and blockers . . . and moving them back and forth repeatedly so the shadow play gets a chance to lock into memory . . . SO helpful!
I really appreciate it. I shot two salads for a client today and this really helped me pull some contrast and color.
emily
this make makes alot of sense now thanks!
health essentials
Charlie
Thankyou for writing this and sharing it. I am going to try the lesson activity on my next day off. This is what I needed ?
Rachel Korinek
So glad to hear it Charlie! Hope it goes well. Let me know if you have any questions 🙂
Michael
Hi Sharon, thank you for a good basic primer.
I don’t really have access to either of my rooms which get actual light as my set-up is in a kitchenette which has one window in an alley (I live in NYC). I’m on the 5th floor out of 10 and there is a stone wall about 6 feet away. So the point is I get no sunlight just i guess low/diffuse light. Can this even be considered/useful or do I need to go full on studio lighting?
ScribdDownloader
Thanks for this informative guide! I never realized how much natural light could transform my food photos. Your tips on positioning and using reflectors are super helpful. Can’t wait to try them out!
Julianna
Hi Rachel, thank you for this article! I’m a food blogger who travels around the world and shares food experiences on Instagram. I was wondering if you have any tips for lightweight gear or setups for travelers? I ordered a portable light from Amazon, but it has a range-ish tone. I’m looking for something with softer lighting.
Julianna
*orange-ish
Katya Bulgakova - Photographer and Makeup Artist
This is an excellent overview of the basic light setup for food photography! I particularly appreciate the emphasis on understanding how light manipulation—such as using diffusers and reflectors—can significantly enhance the quality of food images. The clear explanation of how side light and backlight shape the subject is extremely helpful, especially for beginners. Additionally, the suggestion to observe natural light throughout the day is a great exercise for improving one’s ability to work with different lighting conditions. Overall, this post is a valuable resource for anyone looking to master the fundamentals of food photography lighting!
Christian
A great read! I needed to brush up on my lighting as I have a studio session booked, so thanks for a comprehensive article!
Warren
Wow, a really easy to understand article on lighting, thanks!