Have you ever said to yourself, my pictures just aren’t sharp enough? What am I doing wrong? You feel like you’ve tried a bunch of stuff, but you still can’t seem to get sharp images?
We’ll let’s explore some tips to help you troubleshoot why your images aren’t in focus.
All of these are things I’ve experienced either myself or through teaching others. SO let’s take a look at the tips you can troubleshoot to get sharp images.
Table of Content
- Shutter speed is too low to handhold
- Your shutter speed is really low
- Your tripod isn’t stable enough
- Reduce camera shake
- Autofocus selecting the incorrect point
- Contrast for the lens to autofocus
- Dealing with moving subjects
- Shooting too shallow depth of field
- Shoot too small an aperture
- Lens front/back focusing
- Poor quality lenses
- Not adjusting the diopter
- Think differently when shooting with a macro lens
- Clean your lens
Tack Sharp Images Tip #1: Shutter speed is too low to handhold
This is the biggest area for me in terms of images not turning out to be tack sharp. Where your limits to hand-holding certain shutter speeds lie is a bit of a personal thing.
Shooting for so many years, I know that my limit sits around 1/125. Anything lower than this and I know that I am playing with fire.
SOLUTION: Capture multiple shots using ‘CH’, (continuous high).
If I need to shoot lower due to lighting conditions, say around 1/80 then I use ‘CH” continuous high to capture a few shots and hope that I am steady enough to get one shot out of three.
Knowing where your shutter speed limit lies will assist you in getting tack-sharp images every time.
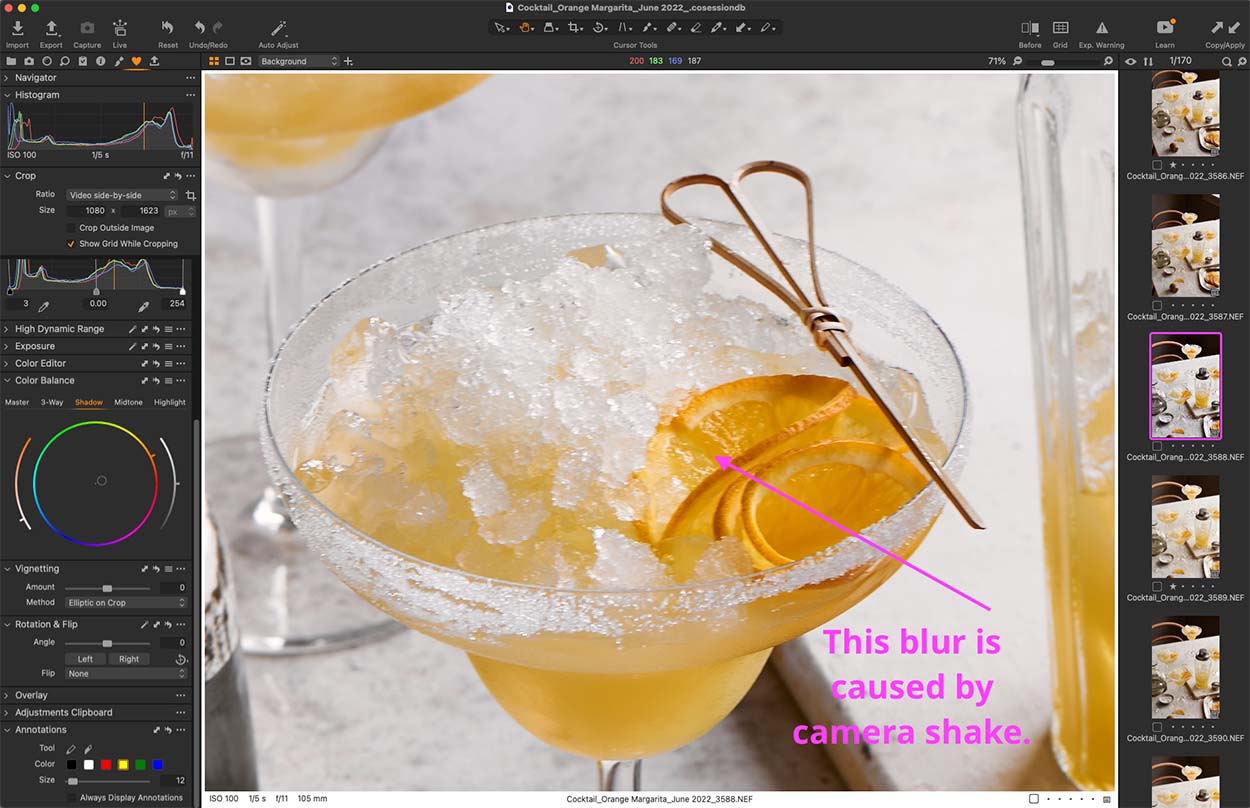
Get Sharp Images Tip #2: Your shutter speed is really low…
As in two low for the amount of light or what you’re trying to capture.
Funny thing is that I didn’t even really know that shooting this low was a thing when I first started. But seeing a professional shoot it on set with their studio stand opened my eyes to what’s possible.
When your shutter speed is super low, it means that the camera’s shutter is open for longer and capturing blur comes into play. This may not be a huge issue with still-life photography that doesn’t move, but it doesn’t mean you can forget about it all together.
SOLUTION: You MUST shoot on a tripod and your set-up needs to be completely and utterly stable.
When I am shooting at really low shutter speeds, I take extra precautions (as outlined in the next couple of points) to make sure my setup is rock solid.
Tip #3: Your tripod isn’t stable enough.
If your tripod isn’t solid as a rock, then you open yourself up to vibration or camera shake that can cause blurry images. I’ve learned that good technique and best practices are the way to go time and time again to eliminate this issue and just get back to composing and creating.
This is especially important when shooting at low shutter speeds.
SOLUTION: Use a weight to steady your tripod.
Depending on how I have my tripod setup, I will use a photography sandbag or weight to steady it. In lieu of not having this option, you can load up a grocery bag with books or cans.
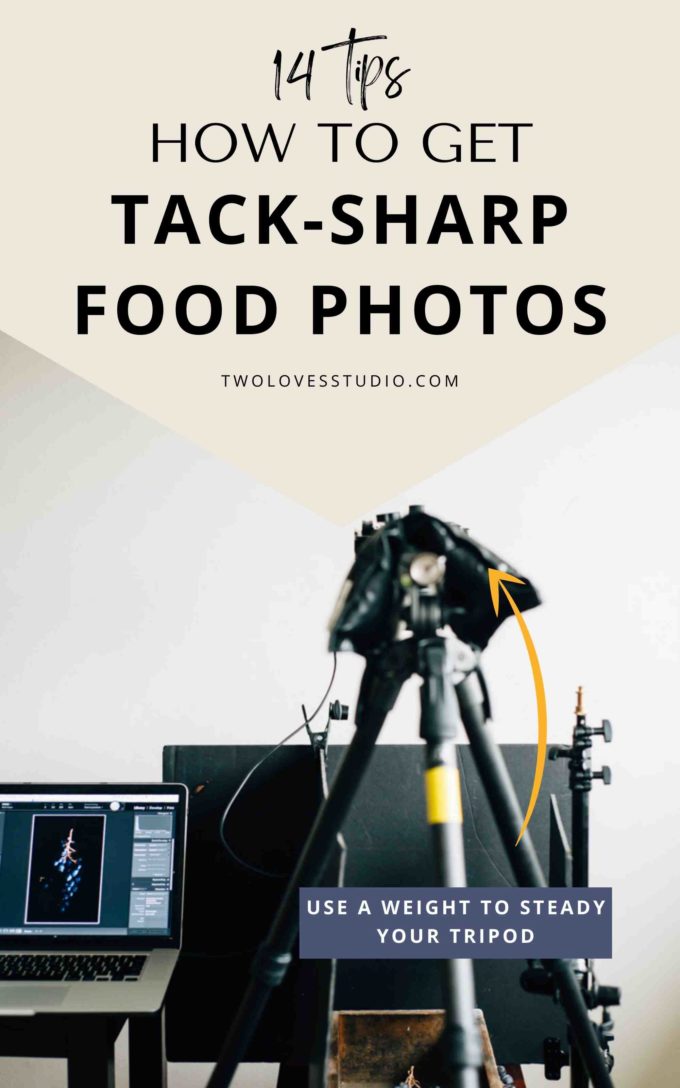
HINT: If you have your weight hanging from your tripod, any movement to the weight can also cause vibration and camera shake. Ensure your weight is still before taking a shot.
Tip #4: Reduce camera shake
Camera shake as I have found out over the years of shooting can be attributed to a number of things like unstable tripod, shooting at low shutter speeds and even having shaky hands.
To capture tack sharp images, you want to basically eliminate any camera shake.
SOLUTION: Use your self-timer or remote shutter release.
Where possible, when I am shooting in low light and I need to eliminate any chance of camera shake, I will use either a remote shutter release option in the following order. When tethering, I use my computer to release the shutter.
This would be my go-to option. If I am not tethering then I will either use the self-timer or a remote. This ensures that I am not touching the camera and allowing shake to occur.
Tack Sharp Images Tip #5: Autofocus is selecting the incorrect point of focus
Autofocus is a great feature, but it can cause you some headaches if you have it set on auto area focus. With auto area focus, you’re letting the camera choose what it thinks you want in focus.
This can obviously be an issue as the camera can’t know what you want to be in focus and will often choose the incorrect subject, leaving your focal subject lacking tack sharp images.
SOLUTION: Use single point focus.
I use autofocus to focus on the subject I tell the camera to.
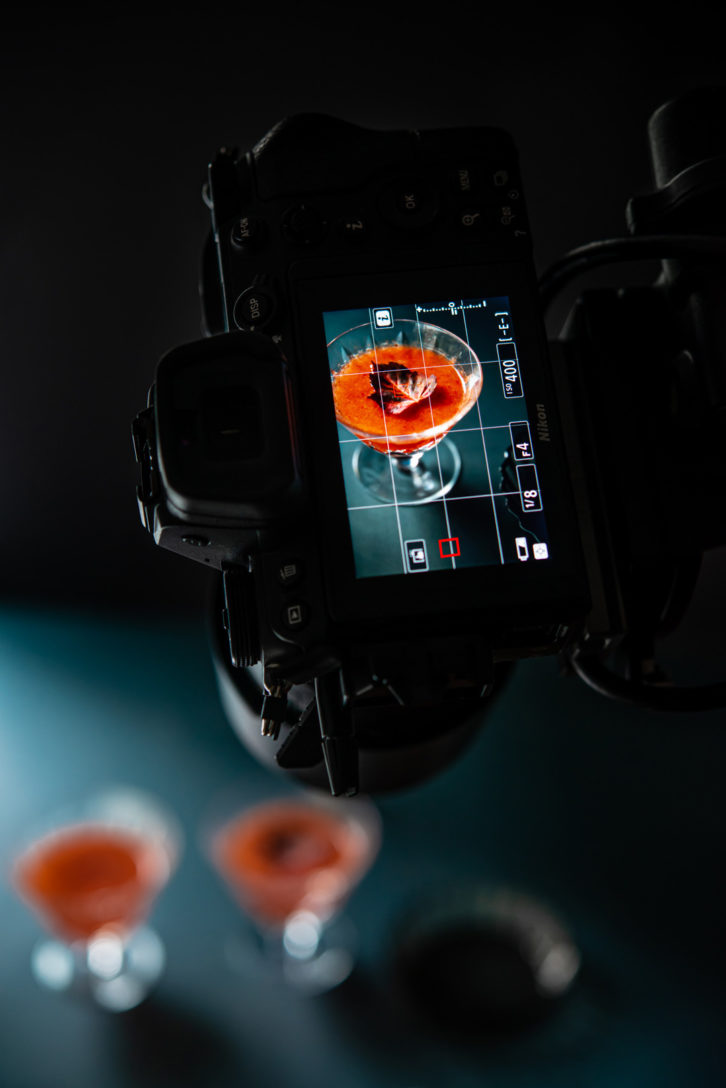
I do this by using single-point focus. I will move the single focus point to be on the subject I desire before I focus. This will ensure that I am the one who is control of deciding which subject and where in the frame will be focused on.
If you’re not sure where to put your focus point, read more about the best focal point here.
HINT: The single point of focus is most accurate when it is the in the middle, if you’re having trouble getting your subject in focus, I ensure my single point is in the middle. I focus on the subject, then reframe for composition before releasing the shutter.
Tack Sharp Images Tip #6: There isn’t enough contrast for the lens to autofocus on
There have been many shoots when I couldn’t work out why my shots seemed to be blurry, and it came down to two things, low light and there not being enough contrast on the subject or area I was focusing on.
This can happen with both tonal and colour contrast. The most obvious is when you’re focusing on negative space in your scene on a white background.
SOLUTION: Use your lens cap to focus on then turn off auto focus to prevent any refocus.
Many times when shooting for magazines or editorials with text requirements, you may have negative space that is in the middle of your image that your camera wants to focus on.
In this example, I had to style ingredients around the edge of the frame for text requirements. To get around the camera not focusing, I put my lens cap into the scene, focused on it, then switched off autofocus before taking the shot.

I also use my hubby’s technique of creating a focus target that I put into my scene to focus on, before removing and shooting.
Tip #7: Dealing with moving subjects such as pouring liquids or restaurant scenes
There are times in my career when I have had to capture moving subjects. The worst time was shooting a kids’ cookbook, where I was dealing with kids and animals.
I remember thinking to myself, I like food because it does what it’s told and doesn’t move! Regardless, that shoot made me realise that I am not savvy with moving subjects and continuous focus.
Too many shots were out of focus and blurry, which seemed like such a waste.
SOLUTION: Shoot on continuous AF.
A simple technique is to set your camera settings to continuous autofocus when capturing moving subjects within food like pouring liquids or capturing chefs cooking in restaurants.
Using this in conjunction with single point focus (where you are in control of selecting the focal subject) with allow you to keep focusing on your subject as it moves.
Read more about the types of autofocus here in this guide.
Tip #8: Shooting too shallow depth of field
I remember getting my weddings photos back and thinking that a bunch of them were out of focus, when in fact they were shot with the 58mm Nikkor f/1.4G.
A lens notorious for being super duper shallow. That silky smooth shallow depth of field is what gets a lot of us into photography and excited to shoot with a DSLR.
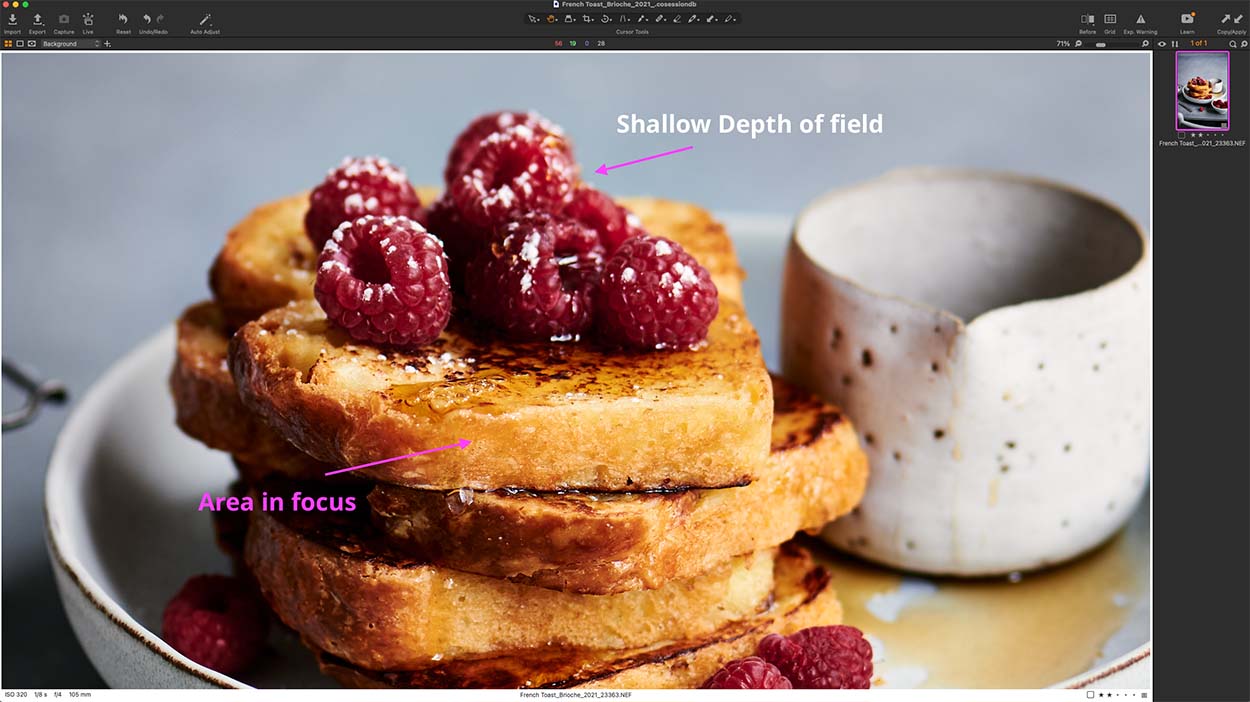
But shooting on a really high aperture can make our images look out of focus. Especially if you miss focus even just slightly.
SOLUTION: Capture a range of apertures to be on the safe side.
When I started shooting for clients and was still finding my feet, I would shoot a couple of different apertures so I had a range of images with varying depths of field.
It was like an insurance policy against images looking out of focus when they actually, in fact, were just shallow.
Over time you will get better at knowing which apertures work best at what angles.
REALTED POST: The Best Tips For Getting Sharp Food Photos
Tip #9: Shoot too small an aperture
Sometimes when we are facing blurry image issues, we think that the solution is to shoot at a really small aperture, (like f/18 or f/22), so we significantly increase the depth of field.
Smaller apertures increase the impact of diffraction. Diffraction is the ‘bending of light’ or interference of light waves with one another.
This bending prevents the light from focusing and the more unfocused light reaches the sensor, the softer the image.
SOLUTION: Capture a range of apertures to be on the safe side.
And if possible stick to higher apertures and adjust your settings.
Get Sharp Image Tip #10: Your lens could be front/back focusing
I was shooting exclusively with my 100mm macro for quite a few shoots when I started to notice that I wasn’t getting tack-sharp images using my single-point focus.
My settings and stability of my set-up weren’t ideal for sharp images. I decide to shoot a range of angles and noticed that this was only occurring for overhead shots.
This led me to do some tests and I found that the lens was forward focusing.
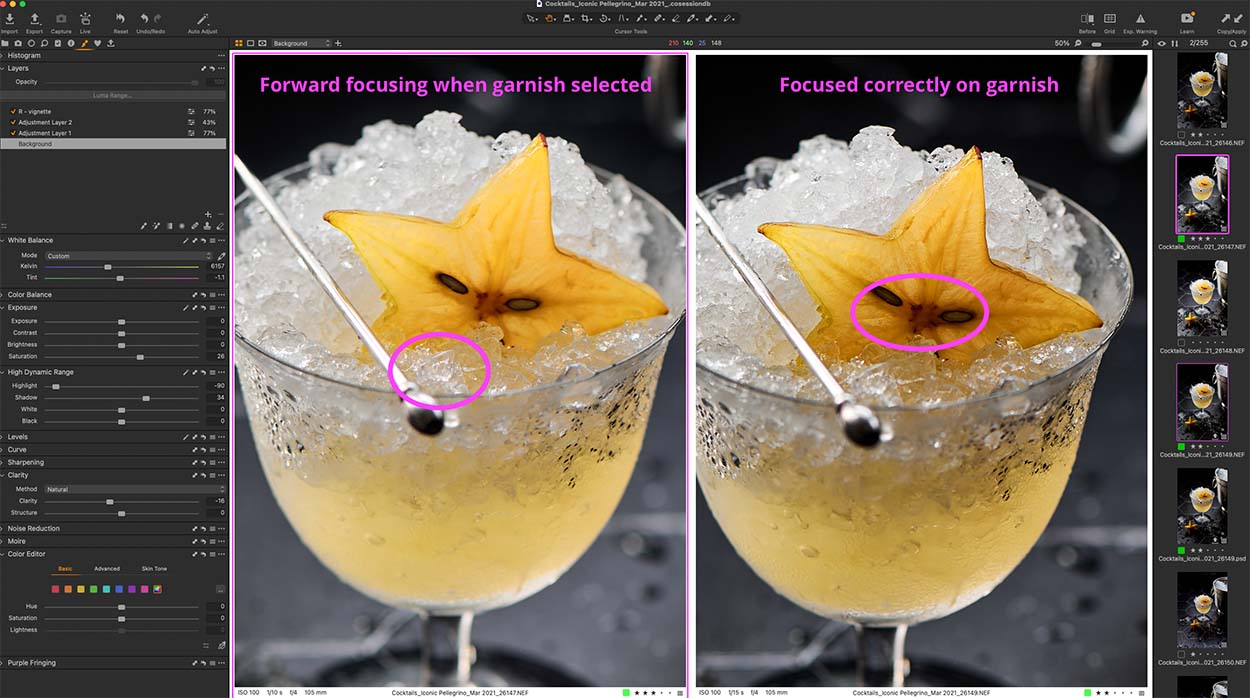
SOLUTION: Ensure your lens is calibrated.
After calibrating my lens, I noticed that it was significantly better at focusing on the selected area. I still didn’t think it was 100% fixed, so when shooting with this lens, I play around with the single-point focus on my chosen subject until I find that sweet spot of focus perfection.
I find this only occurs with this lens, so knowing how your lens is and should be performing will help you better troubleshoot the issue.
Tip #11: Shooting with a poor-quality lens
Lenses are super important when it comes to producing quality photography and tack sharp images.
Most of us will start off with a kit lens as professional lenses are investments. A lot of us will be swayed by zoom lenses that incorporate a range of focal lengths in a bid to save some money.
Zoom lenses can be less sharp than professional primes, and entry level lenses aren’t always good quality.
SOLUTION: Try to avoid shooting at either extremes of the aperture range.
Entry-level kit lenses and some zoom lenses won’t be at their prime focus at all aperture ranges, especially not at the extreme end of the range.

This will depend on the lens, but the 18mm – 55mm won’t be as sharp at f/3.5 as it will be for say f/5.6. Knowing your lens and where its sweet spot in terms of the aperture will help you to get sharp images.
And in the meantime, save up for a professional prime lens to add to your kit.
Read the lenses I recommend for taking beautiful images of food.
Tip #12: Not adjusting the diopter correctly
At one of my workshops, I was helping a student to master manual mode and she was having trouble with focusing. As she was using manual focus, she was focusing but her images were coming out blurry.
When I took a look at her camera, I noticed that they were blurry regardless of what we were doing. The giveaway was that they were blurry through the viewfinder.
SOLUTION: Scroll your diopter wheel until the viewfinder looks perfectly in focus.
The diopter allows you to make adjustments to the focus on view in the viewfinder to suit your vision. This doesn’t change the imaging sensor but will help you if you’re using manual focus.
You want to make sure you have adjusted this setting correctly so you can see exactly how the image will look in the viewfinder.
Tip #13: You need to think differently about shooting with a macro lens
If you’re shooting with a macro lens, it is going to act a little differently to your other lenses. I have seen students when they first get their hands on a macro lens feels like there is something wrong with the lens as it appears to take shots that are out of focus, or blurry.
SOLUTION: Change your angle and plane of focus to get your subject in sharp images.
Macro lenses are going to be a little shallower than your average prime, at similar apertures. If you feel like you’re not getting enough of your subject in focus, then you will need to change angles so that your plane of focus spans your subject differently.
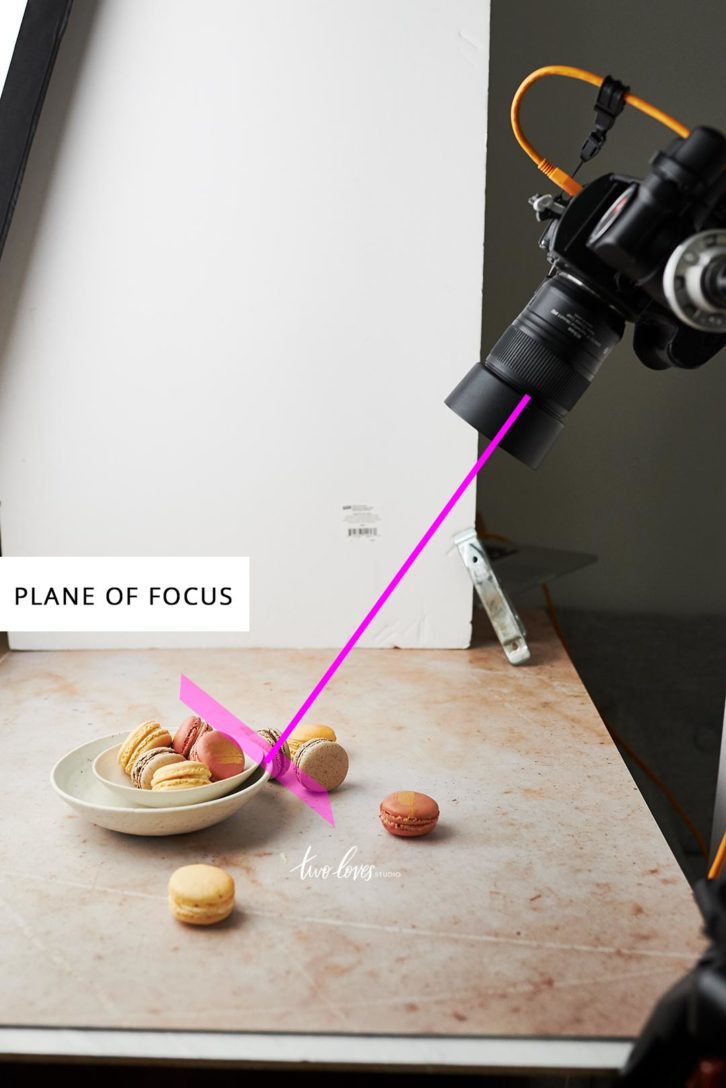
HINT: Shoot at a smaller aperture than you normally would with a prime. Like f/5.6.
Tack Sharp Images Tip #14: Clean your lens!
It might sound simple, but make sure your lenses are clean!
A dirty front element on your lens is a sure guarantee to have inaccurate focus. Taking all of these steps and keeping them in mind is a big step to eliminating blurry and ensuring you get tack-sharp images every time!
If you struggle to take tack-sharp images of your food photography, then I want to hear from you! Let’s troubleshoot through these tips and get your images to be crisp!
Leave me a comment below outlining your struggles with getting sharp images.



Rebecca
This is so useful so much great content and loads of tips for me to try. How do you calibrate a lens?
Thank you xx
Rachel
Hey Rebecca! So glad to hear it. There are a bunch for sure, but they will be a great place to start when you have this issue. Calibration will depend on your camera, you basically are going to be changing the focus so it’s accurate. Calibration occurs in the camera for the camera and lens combination. How to do it will vary depending on your camera, so the best thing is to consult your manual or google for articles for the brand camera you have. You can check out this post by SLR Lounge.
Heather
Thanks! I feel like Am having this trouble lately. One was my diopter. But now I feel like they seem sharp then after I shoot not so much. I have them on a tripod (yes a cheap one), using either 50 mm/ 1.8 or zoom. It’s a new camera (upgraded) – canon 70d- I am not sure if it’s the camera or me getting used to it!
Rachel
Hey, Heather! Sorry to hear that. Glad you worked out it was the diopter. Do you notice a pattern that it occurs with a certain lens or certain angle? Trying to reduce vibrations and camera shake will be important if your tripod isn’t sturdy. There is a heap of tips here for you to try. Let me know how you go!
Julie
This is great Rachel! I really appreciate all of the information that you share and Lightroom Magic was the best investment I’ve made towards bettering my photography. Thank you!
Rachel
Oh that’s so great to hear Julie! Glad you’re loving Lightroom Magic 🙂
Peter
Hey beautiful
You may want to include shooting the lowest ISO you can as well as using a cable release and turning VR off when on a tripod.
Keep up the good work
Rachel
Great points Peter. I do turn VR off on my 105mm when I am on a tripod to reduce shake. Thanks for sharing!
Judi Castille
Hi, this is my big photo problem. I am short sighted and wear glasses and my hands shake so not the best start. I seem to be very hit n miss, so going to follow your tips to the letter. I am due to photograph cheeses for articles, and so far struggling with making them pop from the background. Any advice on taking cheese photos where they are the only food item . White Bal. I am really confused on that.
Rachel
Yes if your hands are shaky it’s best to get yourself onto a tripod, and know where your shutter speed limit is. Definitely, take a look at these tips but start with the tripod if possible. You’ll want to rely on food for props then if you only have cheese. Like if you can use some items that you’d find on a cheese platter. If not, then perhaps cutting the cheese into interesting shapes, or using multiple kinds of cheese. Best of luck – you can do it!
Pauline
Hi Rachel – another great article with explanations that are simple & clear! This one and “how to correctly use autofocus” have answered a few things that have never been really clear to me! And speaking of clear – re the diopter, it’s a good idea if you’re a wearer of glasses to check it regularly. If you need new glasses, you probably need to adjust the diopter!
Thanks again for all the info you share 🙂
Rachel
Thanks, Pauline! You’ve made my day 🙂 Focus really is a layered concept and so I am glad some of these tips helped you. And yes that diopter! What a doozy. You’re totally right.
Joyce
Do you have a recommendation on tripod? I’m using a lightweight aluminum when I started my food photography a few years ago. As my food blog grows, I want to upgrade to a heavy duty tripod that has ball head, 90 degree point down angle (such as the middle column can be removed and position horizontally), the ball head also can be removed and then adapt to a fluid head for videos. I have searched so much but couldn’t find a good solution. I’m wondering if you have any good suggestions. Thanks.
Rachel
Hey Joyce, well I do completely love my Gitzo tripod and Acrotech ball head. It’s a carbon fibre tripod so it’s lightweight and great to carry around (not for travel), but I have a 5kg weight that I use to stabilise it. It’s not a cheap tripod but we’ve had it for a long time and it’s really great. We also had a little Manfrotto one that was really clunky and not functional. (NOT to say that all Manfrotto tripods are like that, just this was an entry level one we had before we really got into photography).
The tripod I have is the Gitzo GT2541EX Series 2 Explorer 6X Carbon Fiber Tripod.
The ball head is the Acratech GP-s Ball Head
Facntatic tripod, but alas it is super expensive. Hope that helps you. Let me know if you have any other questions.
Joyce
Thank you so much for your reply. Wow, the Gitzo is expensive.
Rachel
It is indeed! Maybe one to keep on the wish list.
Sarah
Hi Rachel, Thank you so much for all the time you put into writing the articles you have on your website. I have found them so very helpful!
I’ve been dealing with some focus issues and this post was helpful once again. I think I’ve actually narrowed it down to being the camera’s autofocus system. (Any thoughts on this?) I’ve figured out one way to work around this, but it is still frustrating.
Something else I learned in the meantime that you did not mention here (and that somehow no one ever told me for 5 years!) is that a shutter speed on and around 1/15th of a second will not give you an in-focus image.
Thank you again!
Rachel
Hey Sarah! I am so pleased to hear that this has helped you! Focus issues aren’t fun right? It’s really hard to tell without me seeing your process and images as to what it might be. Working through these tips to eliminate it will be your best place to start!
With regards to the 1/15 sec, I think there is some context missing from what the photographer said. You can definition have in focus shots at 1/15 of a sec, if you think about it – long exposure shots of the night sky are open for 30 secs and they can be in focus. Maybe they meant hand holding at that speed? I’ve taken sharp shots on this speed, but I have to be on a very stable tripod with subjects that don’t move.
Sarah
Hmm… He said it had to do with the mirror coming up and that it was specifically at 1/15th, but it did affect to a lesser degree the shutter speeds on either side of 1/15th too (tripod or no). Faster shutter speeds were not a problem and slower speeds were not a problem either as long as the camera was stable (like on a sturdy tripod as you mentioned).
But now I’m curious! Sounds like I should do some more testing and figure out if this was just a one time mix up (I’ve avoided 1/15th ever since!) or not. Do you shoot on mirror lock up? Maybe that is what I should do?
I really appreciate your thoughts! Thank you again!
Rachel
Ahh yep, gotcha. Well that will happen at all shutter speeds to some degree. And it can affect absolute sharpness, but it’s not something that you will need to worry about. I believe you can shoot on live view as the mirror is already raised and will get around this to an extent. I think that it’s not a huge focus, and these tips will be more beneficial for you. I personally don’t use mirror lockup, but doesn’t mean you shouldn’t explore it!
Sarah
Thank you, Rachel! I understand it better now. 🙂
Naim islam
This is a great photography related blog site. Here I found many important things about photography. I’m a graphic designer at- “Clippingpath.eu” that’s why I’m appreciated about this blog.
Rachel
So great to hear Naim, thanks for stopping by 🙂
Jane
Hello Rachel Korinek! I love your Lightroom Magic Course and have watched each of the videos over and over again. I have also read your many informative articles, including the one on Tack Sharp Images. I have a question about one point in particular. In the article you say:
SOLUTION: Shoot on continuous AF.
A simple technique is to set you camera settings to continuous autofocus when capturing moving subjects within food like pouring liquids or capturing chefs cooking in restaurants. Using this in conjunction with single point focus (where you are in control of selecting the focal subject) with allow you to keep focusing on your subject as it moves.
So here is my question. I get the part about single point focus. I assume you have the lens set to AF? What do you mean by “continuous autofocus”? Is that in the camera menu or is it related to the lens? And where would you put the single point of focus? Let’s say you are pouring milk out of a pitcher over a bowl of cereal. Where would you put the single focal point (at the lip of the pitcher, along the stream or where the liquid hits the top of the cereal)? And would you want a long depth of field or stay shallow at like 2.8 or 3.0?
Thanks for the assistance with this!
Rachel
Hi Jane! Firstly, I am an article on AutoFocus that will this make more sense (I will also link back to it in this blog post).
There are different types of autofocus, single and continuous. This is where you are setting ‘how the autofocus behaves’. You can set it so that it only focuses once, and that’s it. OR you can set the autofocus to continually focus. Sports photographers have to have autofocus continually focusing as their subject is always moving.
You can set what type of autofocus (so single or continuous) you want on the camera. Different brands will be different. On my Nikon, there is actually an external focus button near to the lens that sets this.
Where you put the focus point is going to heavily depend on your angle (and lens). But the lip of the rim can work, or focusing on the cereal if you want that to be more in focus. I would say don’t shoot to shallow if possible. If it were me, I’d start at f4.5-5.6 to make sure I am getting enough in the scene in focus.
Suzen
What a beautiful shoot. I really like these photos! So royal at the same time.Useful and informative article you have written . Its also effective specially for me . I appreciate this blog, I really looking for these kinds of posts for a long time. Thank you for sharing with us.
Govind Vijayakumar
Well-written article Rachel. You are spot on with the tip, shooting in different apertures to ensure that the shallow depth of field does not mess up the food shot. It is really important. Many times, it is difficult to conclude from the small 3-inch camera display whether the subject is tack sharp. Shooting in different apertures from the same angle help to eliminate this issue completely.
Rachel Korinek
I totally agree! Especially as I get older and my eyes are less sharp too – lol. It’s always a good idea I think to shoot different aperatures. Thanks for sharing your thoughts.