This post is written from the perspective of photographing in manual mode.
Knowing my camera settings won’t necessarily help you. Sure, camera settings matter, and yet they don’t.
Of course certain settings control light and DoF, freeze and blur motion and capture sharp, in-focus, quality photos. But what those exact settings are depends on a range of things.
Unless you are shooting in the same space as me, at the same distance, with the same light, the same lens and are going for the same creative elements as me, your settings will be different.
Shooting with natural or artificial light makes a difference too.
Instead, what matters is understanding the relationship between concept and desired exposure. This will help you unlock the best camera settings for food photography.
That’s where this guide will help you! We’ll cover general guidelines for camera settings, including:
- Best quality
- Controlling light
- Freezing and blurring motion, in natural and artificial light
- Controlling Depth of field, including tackling flatlays with different heights
In this Ultimate Guide to Camera Settings for Food Photography, I’ll cover each of these with images and example settings.
The Relationship Between Concept & Desired Exposure
It’s important to understand that the relationship between our creative concept will be dictated by settings that will get us to optimal, desired exposure.
Our settings are going to be affected by the following:
- The amount and quality of light we’re using
- The type of light, either natural or artificial command different settings
- What lens we’re photographing with
- The distance we are from our subject
- What creative elements we want in our photos i.e. motion blur, shallow DoF
Because settings are dictated by the above, these are general guidelines for settings rather than hard and fast rules. However, when it comes to still life, we’re more likely to predominately alter our shutter speed as subjects don’t move.
Camera Settings For Food Photography: Achieving The Best Quality Images
For the best quality images, we need to shoot in good quality light with a quality lens. Assuming we’re photographing in good quality light, generally speaking:
Low ISO and fast shutter speeds give us get the best quality images.
This is certainly reflected in the use of artificial light, strobes or flashes specifically, and is one of the reasons photographers like artificial light. Our ability to change the power of the light, allows us to select a low or base ISO and faster shutter speeds.
Lowering the ISO to base ISO gives us the least amount of noise or grain. Faster shutter speeds help to increase sharp focus and reduce camera shake.
We want to aim for the lowest possible ISO and fastest shutter speed that still gives us the desired exposure for the concept.
Base ISO on the Nikon Z6 is ISO 50.
It’s the combination of settings, a good quality lens and flash that can give a quality look to an image. But that doesn’t mean you can’t achieve good quality images outside of flash photography.
How to Use Your Settings to Control Light
One of the main reasons we photograph in manual mode is to control each setting to bring our creative vision to life. Optimal exposure is a relationship between shutter speed, ISO and aperture.
To let more light into our camera, increasing aperture or ISO, or reducing shutter speed will result in increased exposure.
To reduce the amount of light into our camera, reducing aperture or ISO, or increasing your shutter speed will reduce exposure.
The combination that we choose will depend on:
- ISO – how does the camera handle ISO and are our other settings still giving us access to optimal exposure?
- DoF – can the concept still be communicated with a change in aperture and depth?
- Shutter Speed – can the photo be taken on a tripod allowing more room to reduce shutter speed by eliminating camera shake.
Here are some examples:
This was shot at sunset in autumn. As the light faded, I chose to reduce my shutter speed (to 1/15 sec from 1/30 sec) to let in more light for my desired exposure. I was able to do this due to shooting on a tripod.
I then decided I wanted to capture a shallower depth of field, and changed my aperture to f/2.8. As I wanted the same desired exposure, I reduced my ISO for quality (rather than increasing shutter speed).

Camera Settings to Freeze Motion
Freezing motion requires a fast shutter speed. When I say fast, I am talking about 1/800 sec and higher.
When freezing motion, it’s most important to focus on getting the shutter speed to be fast. The other settings will depend on the type of light we’re using.
How to Freeze Motion With Natural Light
When using natural light, we aren’t easily able to control its power, (unlike with artificial light). Because we need a fast shutter speed, we’ll either change ISO and/or aperture to get our desired exposure.
A higher aperture (smaller f-stop) will let more light in. Or you can increase your ISO to increase captured gain (ISO) of the final image.
The exact shutter speed will depend on the quality and amount of light we’re using.
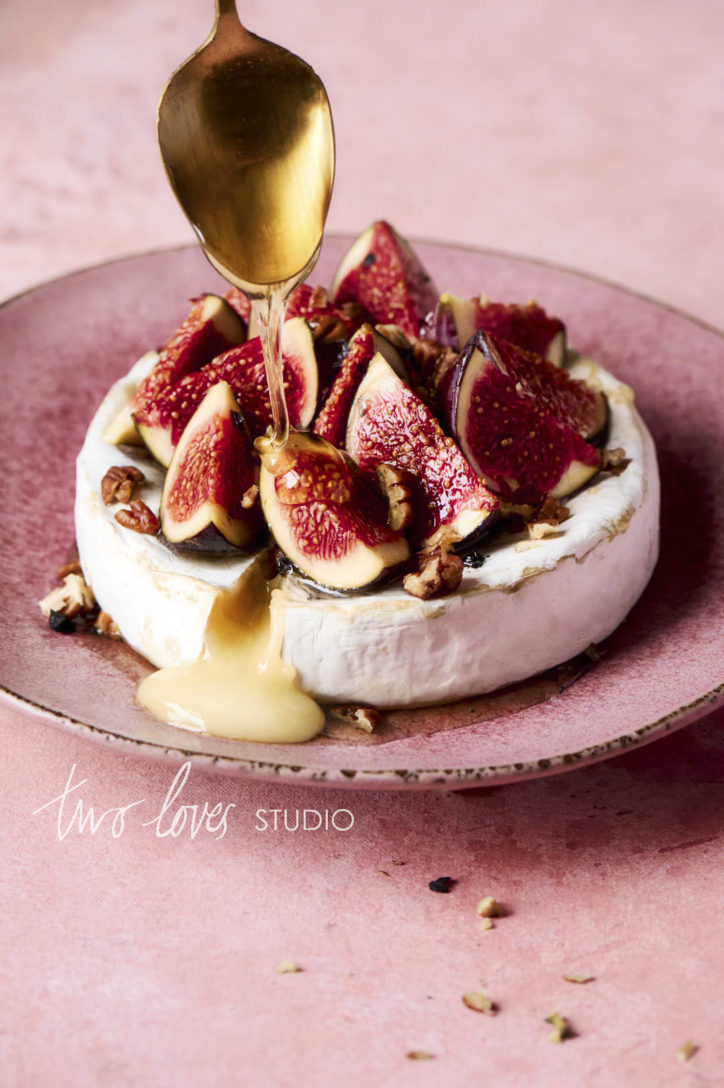
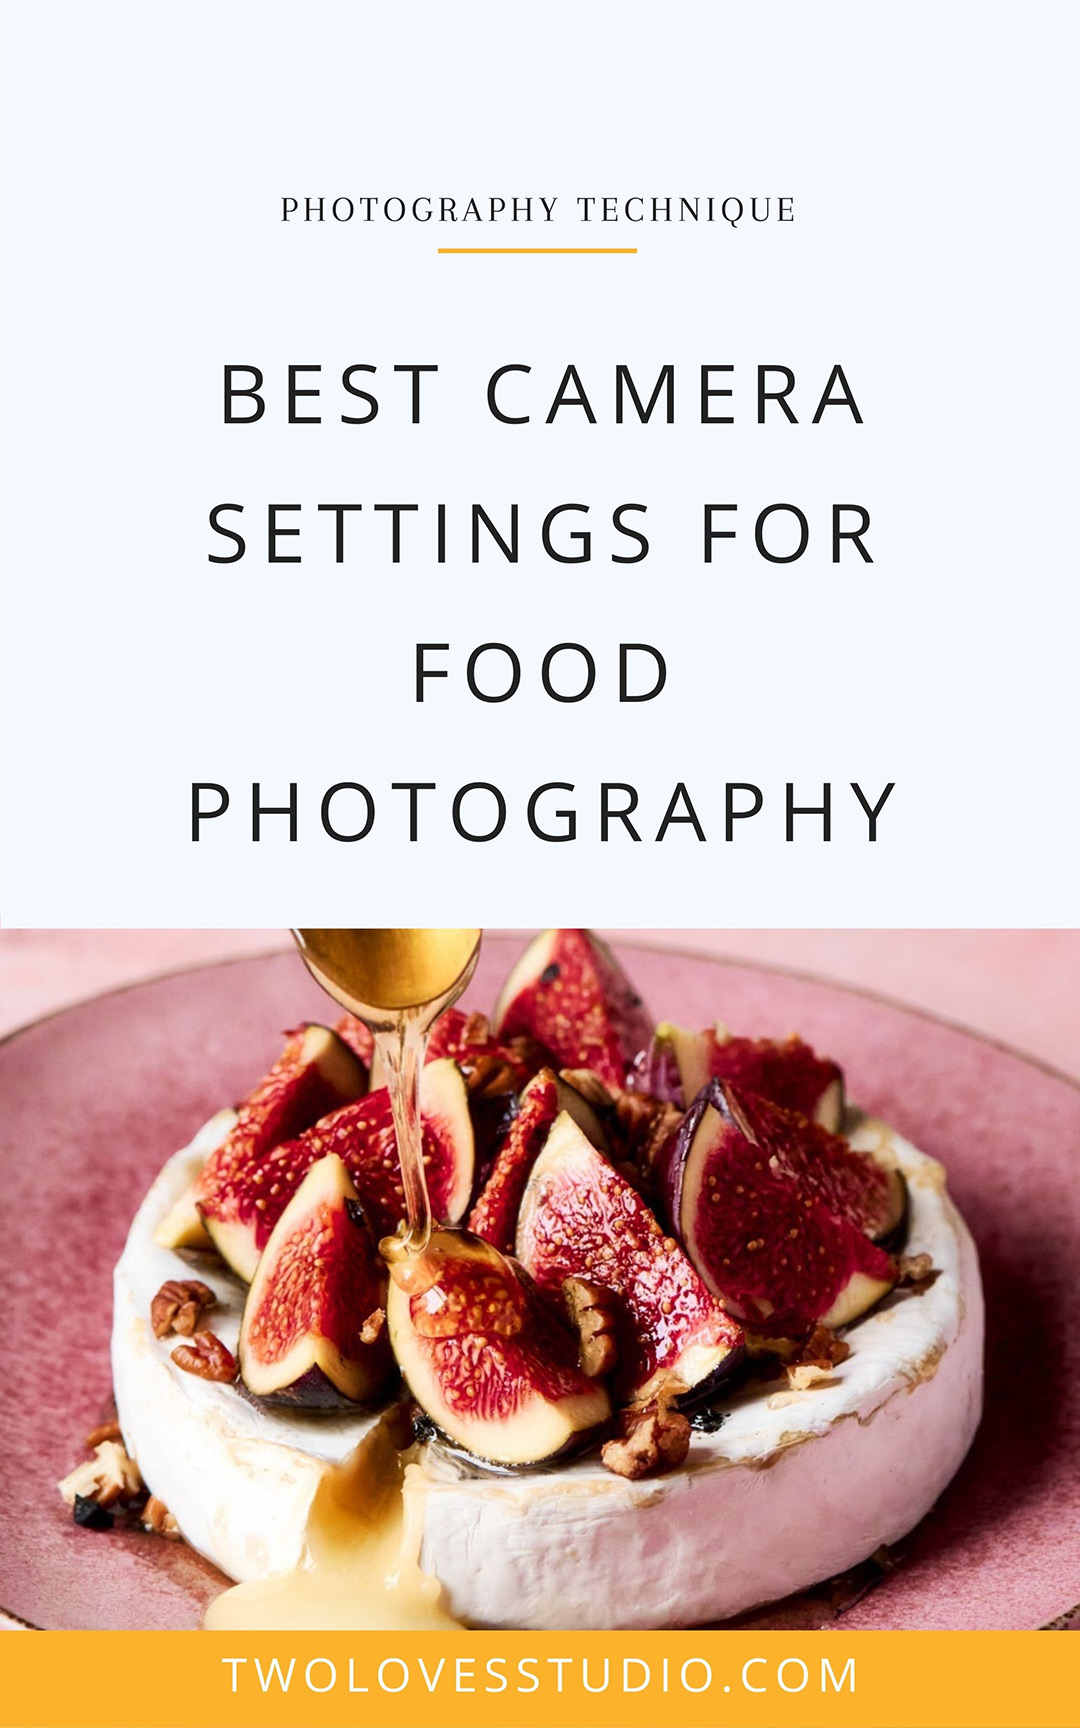
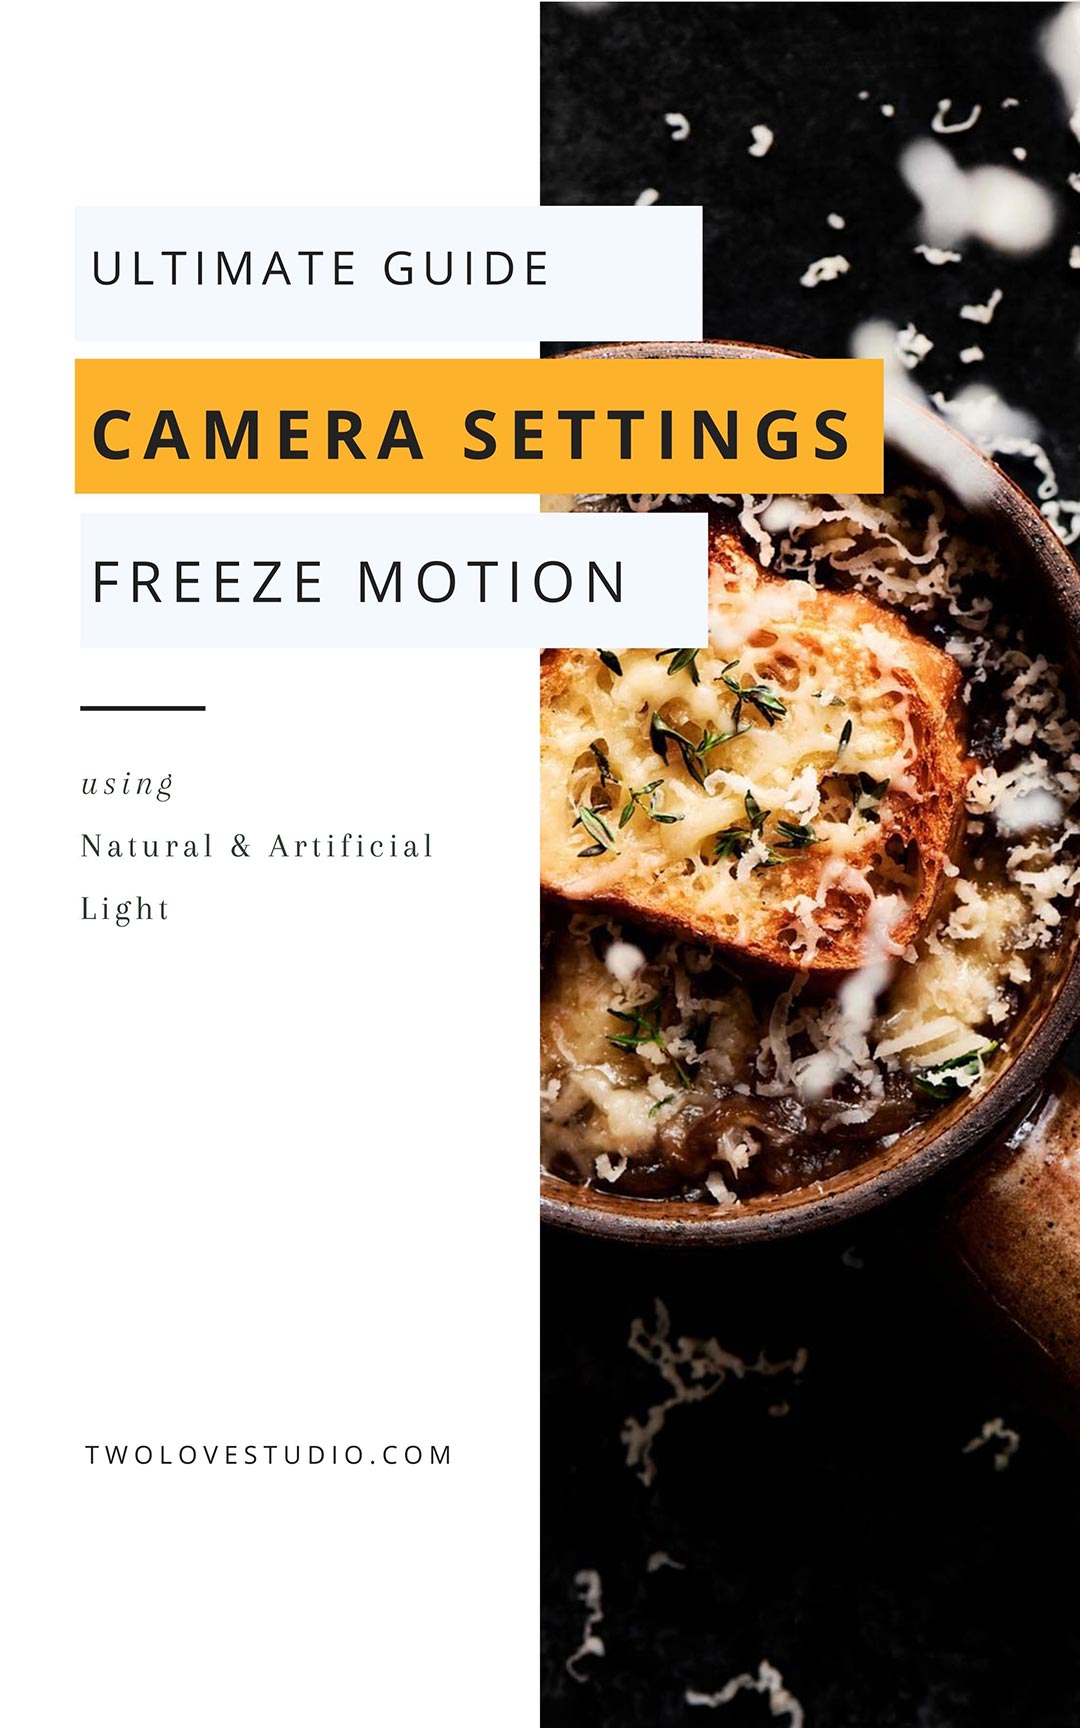
I shot this baked brie dish on a light autumn day with my 105mm macro. Because I wanted to ensure the movement was captured in the plane of focus, I decided to use a smaller aperture (larger number) of f/8.
With the combination of a smaller aperture and a fast shutter speed needed to capture the honey drizzle, (1/800 sec), I had to also increase my ISO to 6400.
Camera settings for this photo are 1/800 sec, ISO 6400 at f/8.
As I had more light to work with, I knew having an aperture with more depth would help me capture the drip in focus. No matter how fast your shutter speed is, if you’re subject in motion is out of the plane of focus, it won’t be *in focus*. It will be blurry or soft, but not because of movement.
ISO 6400 isn’t always an option for everyone depending on the type of camera you have and how new it is. Older cropped sensors won’t handle ISO the same way as the newer technology in full-frame cameras.
Now there are two things you can do here if you need to further control the aperture and DoF, allowing me to reduce ISO.
You can move further away and use a narrow focal length (lens). This puts more distance between the camera and the subject. Larger apertures (smaller f-stop) will appear to have more depth than if you were closer to the subject.
How to Freeze Motion with Artificial light
Settings choices will be different when shooting artificial light because we can now control the power of the light.
Most flashes or strobes have what’s called a maximum shutter sync speed. This means there is a limit to the shutter speed we can use. This limit is usually 1/200 sec.
1/200 sec might not seem fast enough to freeze motion, but due to the extremely short duration of the flash, 1/200 will indeed freeze motion. When I want to freeze motion with my strobe, my camera settings for food photography be set at 1/200 sec.
Because we can control the power of the flash/strobe, we don’t have to increase ISO to reach our desired exposure as we do with natural light.
For a bright shot using artificial light, I will reduce my ISO to base ISO where possible or close to, and keep my aperture at an f-stop that matches my creative vision. Then change the power of the light.
The caveat here is that if you’re using a fast continuous capture, you may have to reduce the power of your flash/strobe and adjust your settings to accommodate. This is so the strobe can still sync (usually not at full power) and take into account any recycle time.
Where I need to use high speed capture, I’ll reduce the power of the light for it to continue to sync. Then increase my ISO as it’s generally near or close to base ISO.
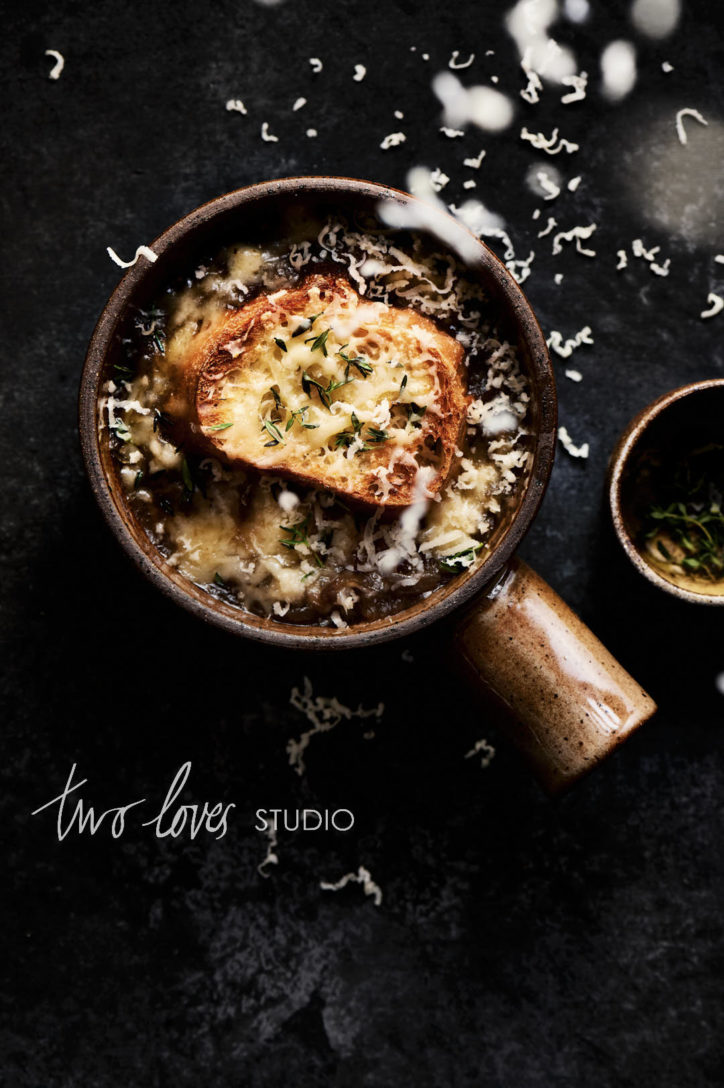
The power of the light for this french onion soup shot was fairly high with base ISO. To use high-speed continuous mode and still sync the strobe, I needed to increase my ISO so I could reduce the power of the light by about half.
How to Blur Motion with Natural Light
Blurring motion or movement in an image is somewhat easier than freezing motion. To blur motion, we need to have a slow shutter speed, generally under 1/200 sec. The slower the shutter speed the more blur we’ll see in the movement.

Reducing shutter speed will let more light in. We therefore need to adjust either aperture and/or ISO.
For a bright shot, I’ll lower ISO (as long as I am still maintaining optimal exposure) and maintain an aperture to an f-stop which matches my creative vision.
To capture blur in a moody shot, I’m generally working with less light to start with so I may need to either increase my ISO and/or aperture. Here I will think about what f-stop is the highest that can still work with my concept and how far away from my subject I am. Then I will also increase ISO to where I am comfortable with.
The Nikon Z6 that I shoot with handles ISO very well, so I can generally push ISO more than other cameras or older cropped sensors might.
You can see the difference between blurred motion above, on the left, we have a slow shutter speed which blurs the falling icing sugar. On the right, exceptionally quick speed of a flash will freeze the falling edible pearl dust at approximately the same shutter speed.
Blur Motion by Using a Continuous Artificial Light Source.
It is possible to blur movement with artificial light, and by using a continuous artificial light source you can get this look most easily.
A continuous artificial source could be a continuous light like my Aputure Light Storm 120D or the modelling light on my B10X Profoto Strobe.
The main difference between a continuous light that’s artificial vs natural light is that we can control both our settings and the power of the light. Often times this means that we won’t have to use very high ISO values in comparison as we have the power to change the light.
To blur this pour shot, I set my shutter speed to 1/60 sec so the motion was blurred. I used the modelling light on my strobe, which doesn’t have as much power as my continuous light.
You can use your shutter speed to give you a degree of creative effect over your movement. For example, this is a fizzy liquid, and you can almost see no bubbles in the liquid due to the amount of motion blur.
Settings for Controlling Depth of Field
A high f-stop (smaller number), will have a shallower DoF. Conversely, a lower f-stop (larger number), will give more depth with more in focus. But nothing in photography is simple. There’s always a relationship.
The amount of depth in your photos depends on the aperture we shoot, the distance from the subject as well as the plane of focus.
How to Capture Deep Depth of Field With a Macro Lens
Because depth of field is affected by aperture and distance, it can seem like narrow macro lenses (90mm/100mm/105mm) are more shallow than regular lenses.
That’s not the case. Macro lenses have a very generous minimum focusing distance that allows us to get closer to our food.
This compresses the subject and exaggerates the effects of depth of field.
The closer we are to our subject, the more we’ll want to test a smaller f-stop (larger number). I usually aim for f/5.6-f/8 as a starting point for my 105mm macro and then reduce it even further to f/11-f/16 if I’m very close.
RELATED: Secret to Macro Photography – Plane of Focus
Capturing a Deep Depth of Field With a Regular Lens
Non-macro lenses have a meager focusing distance so we’re generally further away from our subject. This means that aperture appears to have more depth.
An aperture of f/5.6 will appear to have more depth with a regular lens than a macro lens. On a regular lens, I will shoot between f/5.6 and f/8 to capture depth.
Always be mindful of your distance and compression, then adjust accordingly.
How to Tackle DoF When Shooting Flatlays With Varying Heights
When dealing with varying heights when shooting overhead we want to utilise distance to our advantage.
This means thinking more than just about the camera settings for food photography, or aperture. The trick is to position our focus on a subject whose height is halfway between the background and the top of the tallest subject.
This will allow us to capture more depth than if we were to focus on the extremes, (i.e the background being the shortest subject with no height, and the top of the tallest subject).
In this shot, (was created for my composition masterclass), I would focus my focal point on any of the three fruits with the pink circle.
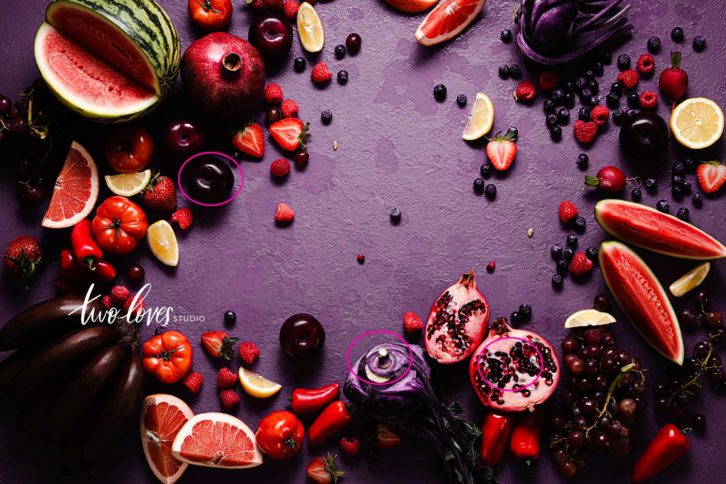
In combination with the position of the focus, we’ll want to try to use a smaller aperture (larger f/stop) to capture the subjects in focus.
Camera Settings For Food Photography: How to Capture a Shallow Depth of Field
If we’re looking to capture a shallow, yet soft buttery depth of field, the good news is that the closer we get to the subject (or the more the lens compresses the distance) the shallower the DoF will be.
For macro lenses, we can find that f/3.5 might give us a shallow DoF as we’re closer. A regular lens however, you might need to go to f/1.8 to get that feel.
with 105mm macro.
with 85mm lens.
I love my 85mm lens, however, the minimum focusing distance means that I can’t get close to my subject. So for portraits, I’m sometimes further away than when I use my 105mm macro. This means to capture that soft buttery DoF, I often need to shoot apertures between f/1.8 – f/2.8 to achieve that look with my 85mm.
From capturing motion to blurring motion, controlling light and DoF, we’ve covered a lot of guidelines for settings.
If you have any questions regarding the best camera settings for food photography to achieve some of the techniques we discussed in this post – leave me a comment and let’s chat.


Safia
This is a fantastic guide! Thank you so much for putting this together. If I’m doing still life photography, would you suggest that an 85mm lens is probably more useful/versatile than a 105mm macro?
I have been following you on Instagram for a while and I love your imagery so much!
Rachel Korinek
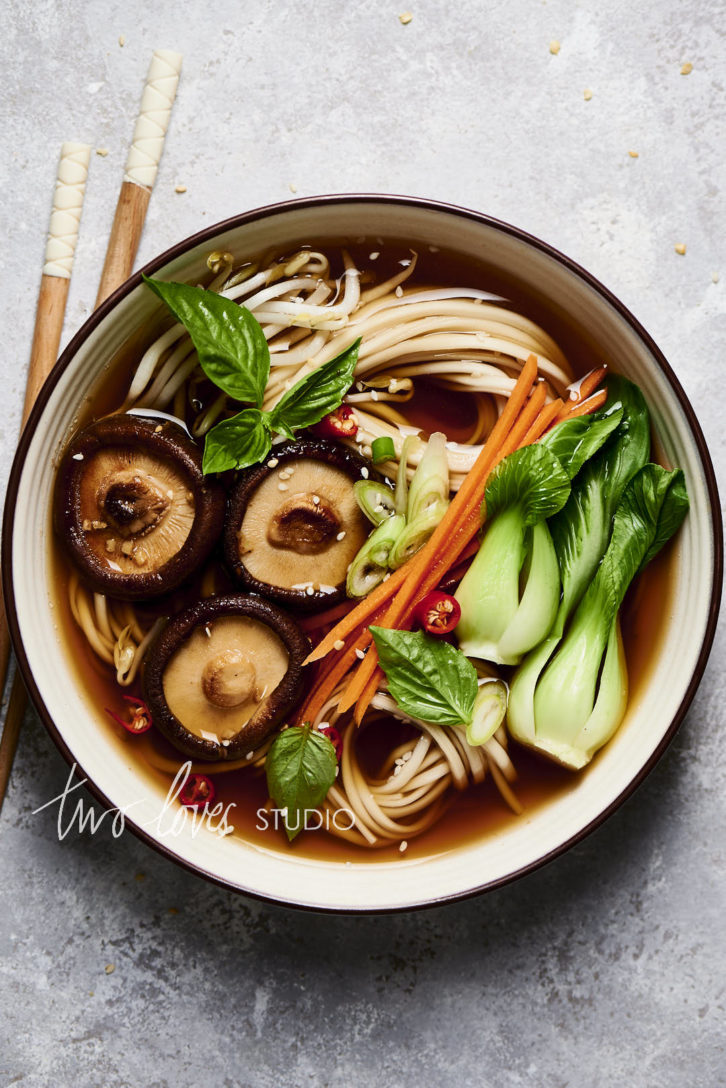
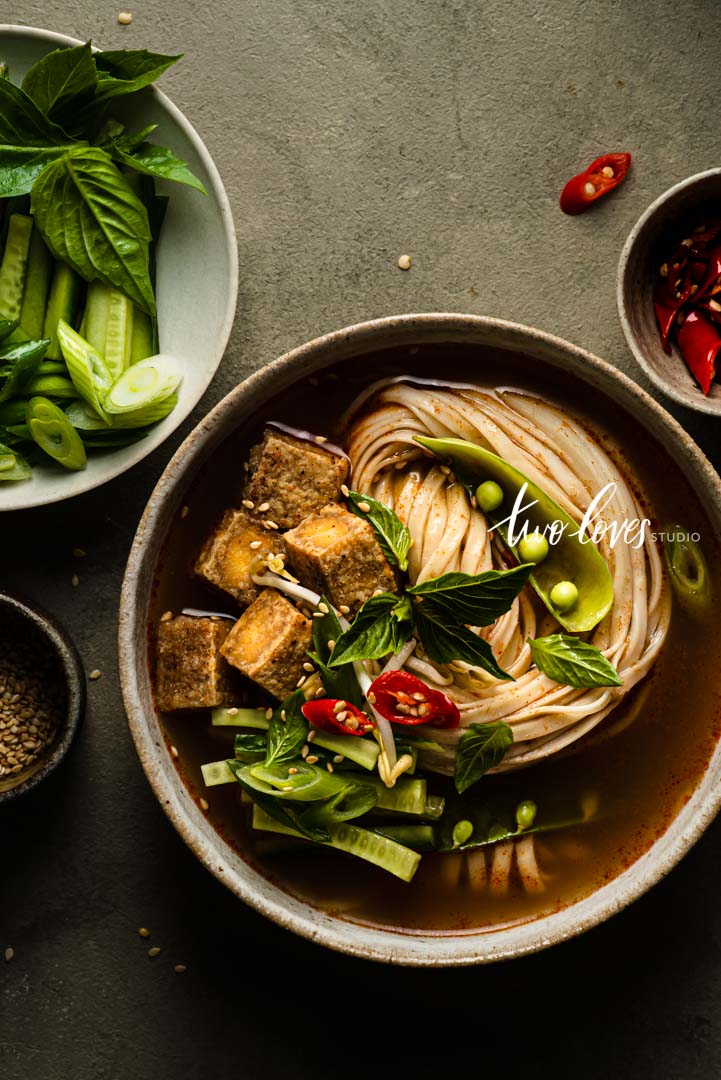
You’re so welcome Safia! Oh, that’s a tough one. I think the most versatile focal length would be the 50mm as it’s a great all-rounder. It can be a true statement that ‘normal’ focal lengths around 50mm could be more versatile than narrow lenses for our niche, so it could be true that 85mm might be more versatile than 105mm. However, lenses are focal lengths aren’t the same thing. The 85mm has a large minimum focusing distance which I think makes it less versatile as you can’t get up close like you can with the macro 105mm. I personally use my 105mm for 45-degree shots, macro shots and overhead shots like the noodle soup at near the beginning of the post. For me, 105mm would be more versatile. That caveat here is that you need space in order to get ‘higher’ or ‘further’ to capture more of a scene. Hope that helps!
Rita
Thanks so much for this guide, Rachel! It opened my mind and I am starting thinking about studying some of your suggestions and put them into practice. I have a 60D Canon and two lens, a Canon 50 mm 1.8 and a Tamron 35mm 1.8. I will try to push my ISO a bit more, and I will start to increase my DoF, because I never really tested my camera about ISO. I am a newbie in food photography, and shoot only with natural light, do you have any advice for me?
Thanks again!
Rita
Rachel Korinek
Thanks for stopping by Rita! I am so glad that you like the post. Thanks for reading. It’s best to read reviews on ISO for your camera and see what you personally can handle in terms of noise. ISO isn’t simple (though it’s often explained to us in an oversimplified manner). My biggest advice would be to use a tripod so you can really reduce your shutter speed. Know your environment and see when low shutter speeds can introduce camera shake (like bouncy floors!). Try to keep ISO as low as you can without compromising optimal exposure and never underexpose at high ISO (I rarely say ‘never’, but this is one of those occasions where I will!).
suzanne
so very helpful, especially the bit about where to position the focus in a flat lay to capture the most depth. thank you!
Rachel Korinek
That sure is a helpful element and something I get asked a lot so I hope that really helps you with focus and depth in your images 🙂 thanks for stopping by xx
Michela
Hi Rachel!
Thank you very much for this guide, I found it very useful, as well as your other blog posts. You are very generous and competent!
I’ve been approaching food photograpyh for a few months now, I have a Canon crop frame and at the moment I only have one lens, the 50 mm 1.8.
I feel very good with it but I would like to buy also a 24mm 2.8 to have the possibility to let more space in the frame, both for table top photos (with lots of things in the frame) and interior photos (example: photos in restaurants).
Do you think this lens would fit or do you have something else to recommend?
I know there would also be the 35 mm that would be a 50 mm on my camera but I fear this won’t be wide enough to take photos of interior when there is not enough room to move further…
Thank you very much for you help!
Miki
Rachel Korinek
Thank you Miki for those kind words! From a full frame perspective, this is what I recommend. A 50mm (or equivalent) for overhead flat lays and a 35mm (or equivalent) for restaurant interiors. The issue with the wider 35mm for flatlays (24mm equivalent on cropped sensor) is that you can get perspective distortion with wide-angle lenses. So in a perfect world, you’d have both. If the budget is tight, I recommend renting both a 24mm and 35mm focal length and seeing if you can get everything you need in a 35mm for both.
If you need some further guidance, here are some posts I have on the subjects:
https://twolovesstudio.com/blog/focal-lengths-for-cropped-sensor/
https://twolovesstudio.com/blog/35mm-focal-length/
Hope that helps 🙂
Michela
Thank you so much Rachel, I really appreciate 🙂 can’t wai for your next post!
Rachel Korinek
Always a pleasure 🙂
Olga
Hi Rachel!
I am new to your community and such. I thank you for the wonderful work that you do! And a big thank you for this wonderful post! It has helped me greatly to sort out my camera settings. I still want to ask a question that’s been burning me for quite a while, and I’d like to know if I am moving in the right direction to resolve it after reading your post on camera settings.
So the question is, How do I achieve a sharp focus in an image that I am shooting at eye-level? Here, I am talking about everything being in focus from top to bottom, like let’s say, a stack of ice cream sandwiches that takes up most of the frame, a burger or a stack of doughnuts that gets drizzled with honey or caramel.
The closer I get to the subject, no matter how small my aperture is, I end up with either the lower third or the upper third of the image being out of focus. So I end up increasing the distance between me and my subject by increasing the focal length on my regular 24-105 mm or 24-70 mm lens (those lenses produce a nice deep DoF in my opinion) and cropping the image in post production for a tight perspective. When I do this though, I feel like I miss out on my creative vision because the image comes out looking somewhat to completely different, especially in terms of capturing light.
I once shot a stack of doughnuts being drizzled with honey at eye-level. I somehow was able to get the stack in focus, but the drizzle came out looking blurry. I read your post on the plane of focus, and it’s starting to stick with me; but how do I change my camera angle here if the vision is the eye-level and I need every detail from top to bottom in sharp focus plus I need to freeze the movement? How do I do this please? I am going to lose sleep over it! Any suggestions?
Rachel Korinek
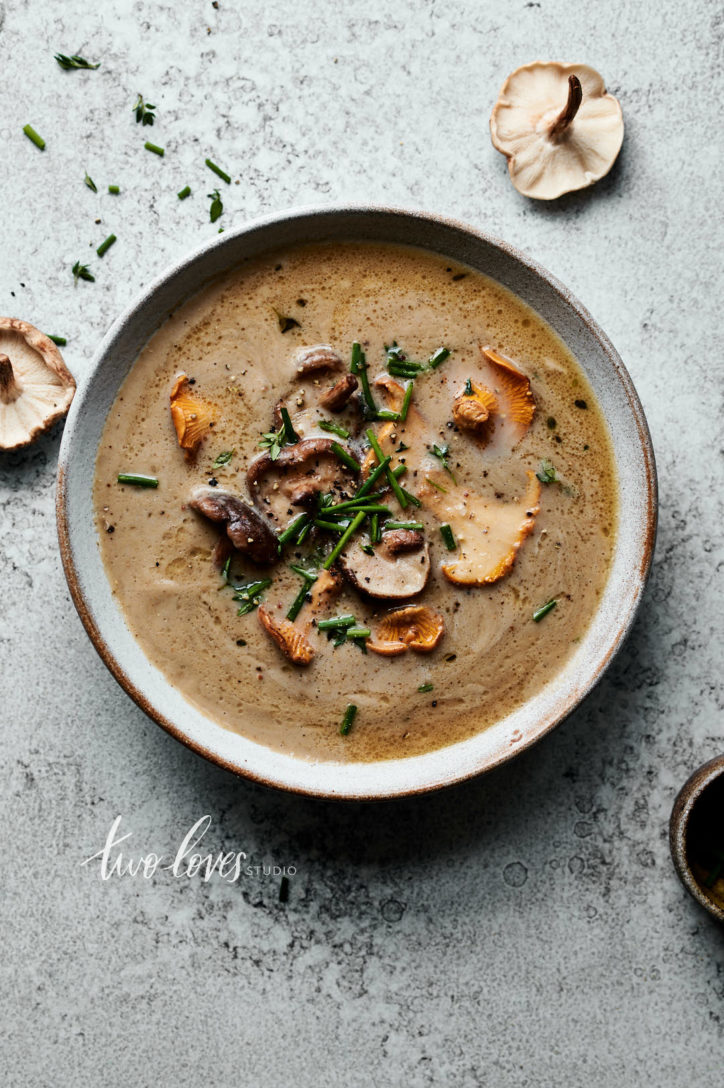
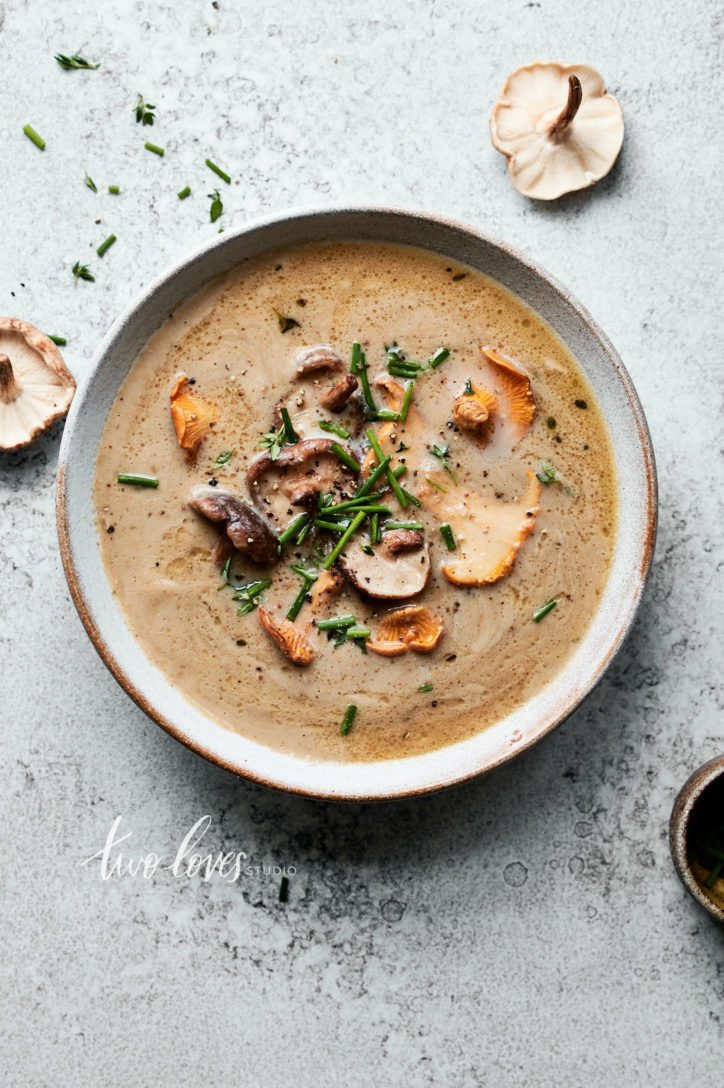
Yes Olga, it will come down to the *plane of focus*. The thing to remember is that in food photography, we are much closer to our subjects than say interior photography so the effects of aperture, distance and plane of focus will feel exaggerated. You’ll especially notice that at 45-degree angles you aren’t able to get both the drop and the food in focus if you’re wanting the entire drip to the top of the frame in focus. We must problem-solve to ensure all the elements we want in focus will be in the plane of focus. The easiest way to do this is to have a straight-on angle (from 0-25 degree for example) and then you will be able to get the drip and dish in focus. If you take a look at the Baked Brie and Honey Drip shot in this post, you will notice the almost straight on angle so that the drip, the figs and the brie ooze are all in focus.
Karen
Rachel – Thanks for this helpful post – you are always an inspiring teacher.
I struggle with product photography. I shoot with either a Sigma 50 mm 1.4 and my Canon 100 mm macro on a Canon 5DS. I love a shallow depth of field in general, but that means I cannot get the hero dish AND the packaging in focus at the same time. Any hints on approaching this?
Rachel Korinek
So glad you found it helpful Karen! Depth of field is controlling by your f-stop and also the distance to your subject. It is true that sometimes based on f-stop and distance, you might not be able to get the hero dish and packaging in focus. We need to keep the ‘plane of focus’ in mind when we style our scene and *if* the hero dish and packaging will be within this plane. Make sure to read about the plane of focus here: https://twolovesstudio.com/blog/macro-food-photography-plane-of-focus/
The other option is what’s called ‘focus stacking’ so you can use Photoshop to composite two images together with different focus areas. Something I teach in my Photoshop course Retouching Food Photography.
Karen Tedesco
Off to learn more Photoshop tricks – thank you!
Sophie Richards
I never fully realized the importance of adjusting the ISO for food camera shots until I saw your images. I love love the glass shot, that perfect splash is pretty cool! Thanks for your tips.
Rachel Korinek
Thanks for stopping by Sophie! Yes, ISO is a tool we don’t use as much as we’ve been afraid to. But with technology getting better and better, higher ISO isn’t so much of a problem with newer cameras! x
Photographe à Bruxelles
I just discovered your blog, very helpful and inspiring. Thank you!
Rachel Korinek
So glad you’re enjoying it! Thanks for stopping by x
Millie Mae
After weeks of struggling to get my shots right this has gave me confidence again! What a great and comprehensive guide thank you!
Rachel Korinek
Super to hear that Millie! So glad you found these setting guides helpful. Happy shooting x
Rachel Korinek
So glad that you enjoyed reading this post!
spphotographystudios
Hi. I appreciate you for the camera setting tips. Very happy while reading your post. Keep posting.
Rachel Korinek
I’m so glad to hear that! Happy shooting.
cutoutpath
Our Professional Photo Editing Service Provider Company , I have 150+ member team of image editing. I really do good work of image editing,
I will give work with satisfaction or with in time, my team is very talented and responsibility people,
So sir, don’t heist. If you give me 02 samples, about our services: https://cutoutpath.com/
I will give them free of cost. Before checking our work quality & creativity or capacity then you can give us work.
Lau Berbel
Woww very useful information! Thank you very much 🙂
Rachel Korinek
So glad you found it helpful Lau! x
Donna
Hello Rachel, your posts are so helpful. I found this post after struggling for a while (happy to have found it). I would like to know at what distance your 105mm lens was from the noodle soup. I have been settling by using my 50mm for overhead shots but would like to put my 105mm to better use. Thanks 🙂
Rachel Korinek
Hey Donna, I use a tripod that goes very high, so I would be 1-2m above the soup perhaps. The tripod has to be very stable in order for you to get this high. You can check out my tripod post here. Here is an example of how high I would be with this lens. Hope that helps!
Caroline Hazell
I have just purchased Nikon Z6, updating from Nikon D750. I am having trouble with overhead shots, knowing when the camera is level. It can end up looking like the food is about to slide off the table. On the D750 you can see a guide in the viewfinder which shows the spot when everything is level but I can’t seem to find this on the Z6. Can you help?